React 的代码库现在已经比较庞大了,加上 v16 的 Fiber 重构,初学者很容易陷入细节的汪洋大海,搞懂了会让人觉得自己很牛逼,搞不懂很容易让人失去信心, 怀疑自己是否应该继续搞前端。那么尝试在本文这里找回一点自信吧(高手绕路).
Preact 是 React 的缩略版, 体积非常小, 但五脏俱全. 如果你想了解 React 的基本原理, 可以去学习学习 Preact 的源码, 这也正是本文的目的。
关于 React 原理的优秀的文章已经非常多, 本文就是老酒装新瓶, 算是自己的一点总结,也为后面的文章作一下铺垫吧.
文章篇幅较长,阅读时间约 20min,主要被代码占据,另外也画了流程图配合理解代码。
注意:代码有所简化,忽略掉 svg、replaceNode、context 等特性
本文代码基于 Preact v10 版本
Virtual-DOM
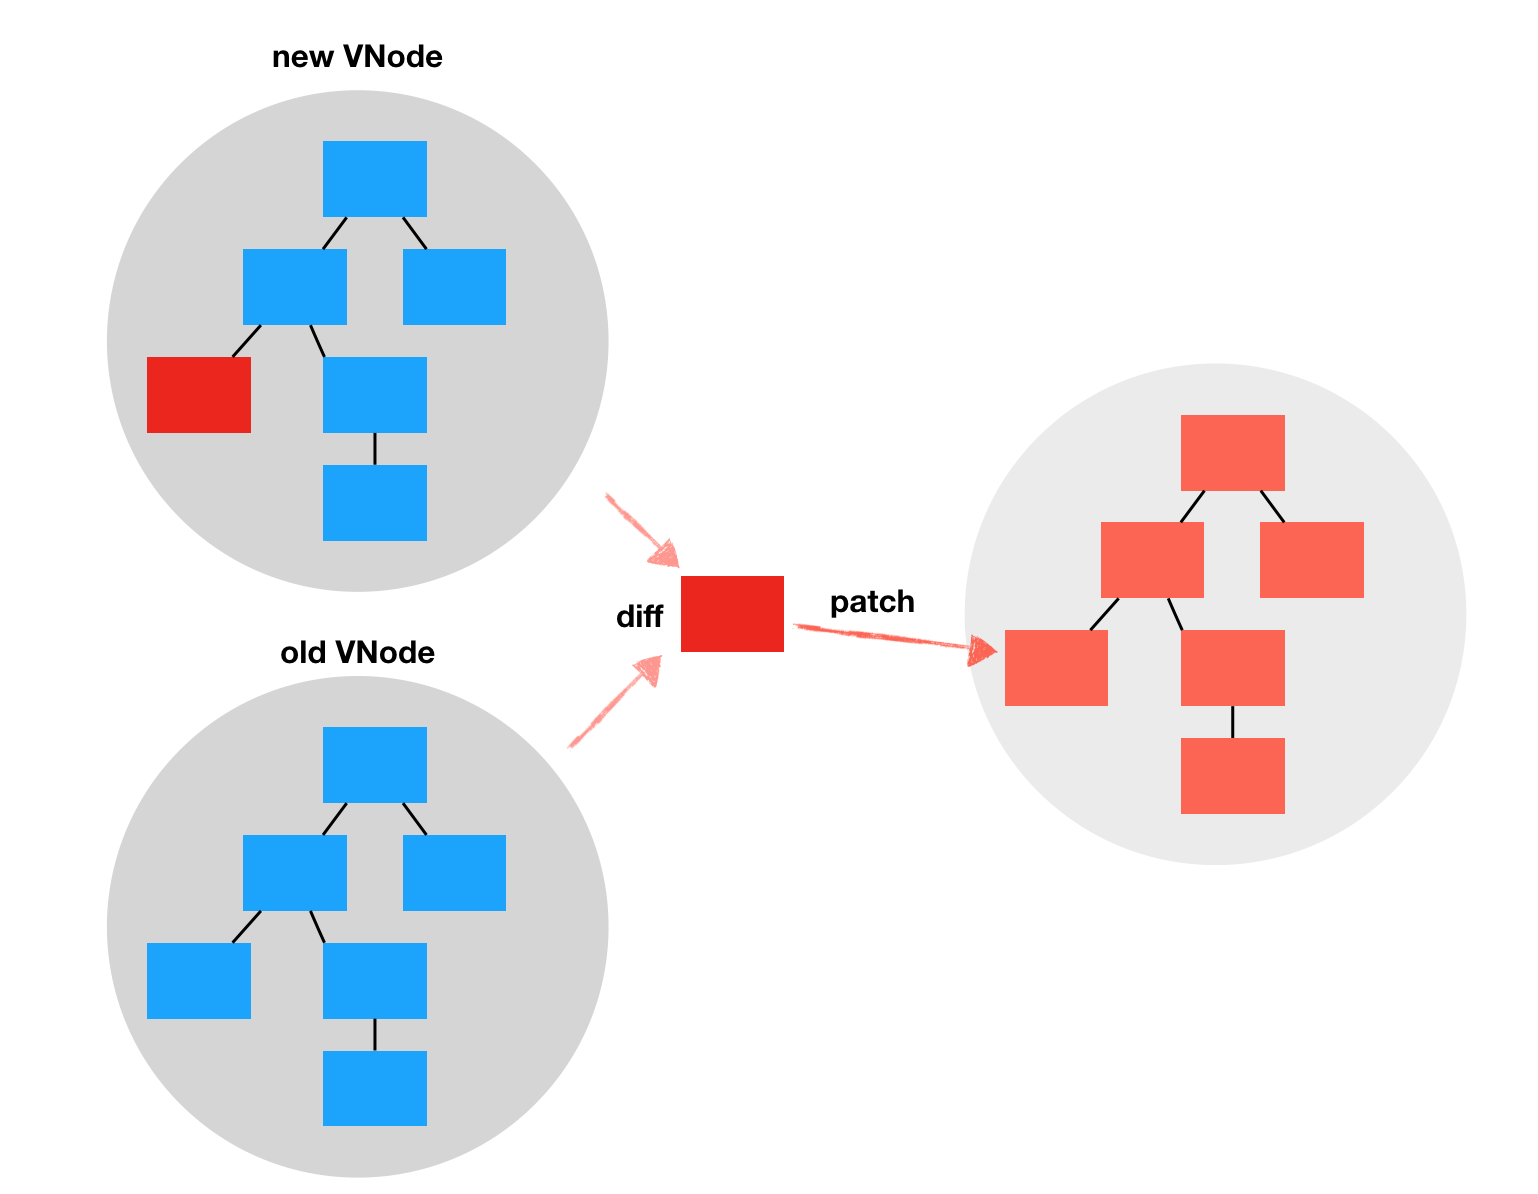
Virtual-DOM 其实就是一颗对象树,没有什么特别的,这个对象树最终要映射到图形对象. Virtual-DOM 比较核心的是它的diff算法.
你可以想象这里有一个DOM映射器,见名知义,这个’DOM 映射器‘的工作就是将 Virtual-DOM 对象树映射浏览器页面的 DOM,只不过为了提高 DOM 的’操作性能’. 它不是每一次都全量渲染整个 Virtual-DOM 树,而是支持接收两颗 Virtual-DOM 对象树(一个更新前,一个更新后), 通过 diff 算法计算出两颗 Virtual-DOM 树差异的地方,然后只应用这些差异的地方到实际的 DOM 树, 从而减少 DOM 变更的成本.
Virtual-DOM 是比较有争议性,推荐阅读《网上都说操作真实 DOM 慢,但测试结果却比 React 更快,为什么?》 。切记永远都不要离开场景去评判一个技术的好坏。当初网上把 React 吹得多么牛逼, 一些小白就会觉得 Virtual-DOM 很吊,JQuery 弱爆了。
我觉得两个可比性不大,从性能上看, 框架再怎么牛逼它也是需要操作原生 DOM 的,而且它未必有你使用 JQuery 手动操作 DOM 来得’精细’. 框架不合理使用也可能出现修改一个小状态,导致渲染雪崩(大范围重新渲染)的情况; 同理 JQuery 虽然可以精细化操作 DOM, 但是不合理的 DOM 更新策略可能也会成为应用的性能瓶颈. 所以关键还得看你怎么用.
那为什么需要 Virtual-DOM?
我个人的理解就是为了解放生产力。现如今硬件的性能越来越好,web 应用也越来越复杂,生产力也是要跟上的. 尽管手动操作 DOM 可能可以达到更高的性能和灵活性,但是这样对大部分开发者来说太低效了,我们是可以接受牺牲一点性能换取更高的开发效率的.
所以说 Virtual-DOM 更大的意义在于开发方式的改变: 声明式、 数据驱动, 让开发者不需要关心 DOM 的操作细节(属性操作、事件绑定、DOM 节点变更),也就是说应用的开发方式变成了view=f(state), 这对生产力的解放是有很大推动作用的.
当然 Virtual-DOM 不是唯一,也不是第一个的这样解决方案. 比如 AngularJS, Vue1.x 这些基于模板的实现方式, 也可以说实现这种开发方式转变的. 那相对于他们 Virtual-DOM 的买点可能就是更高的性能了, 另外 Virtual-DOM 在渲染层上面的抽象更加彻底, 不再耦合于 DOM 本身,比如可以渲染为 ReactNative,PDF,终端 UI 等等。
从 createElement 开始
很多小白将 JSX 等价为 Virtual-DOM,其实这两者并没有直接的关系, 我们知道 JSX 不过是一个语法糖.
例如<a href="/"><span>Home</span></a>最终会转换为h('a', { href:'/' }, h('span', null, 'Home'))这种形式, h是 JSX Element 工厂方法.
h 在 React 下约定是React.createElement, 而大部分 Virtual-DOM 框架则使用h. h 是 createElement 的别名, Vue 生态系统也是使用这个惯例, 具体为什么没作考究(比较简短?)。
可以使用@jsx注解或 babel 配置项来配置 JSX 工厂:
render(<div>hello jsx</div>, el);
|
本文不是 React 或 Preact 的入门文章,所以点到为止,更多内容可以查看官方教程.
现在来看看createElement, createElement 不过就是构造一个对象(VNode):
export function createElement(type, props, children) {
props.children = children;
if (type != null && type.defaultProps != null)
for (let i in type.defaultProps)
if (props[i] === undefined) props[i] = type.defaultProps[i];
let ref = props.ref;
let key = props.key;
return createVNode(type, props, key, ref);
}
export function createVNode(type, props, key, ref) {
return { type, props, key, ref, constructor: undefined };
}
|
通过 JSX 和组件, 可以构造复杂的对象树:
render(
  <div className="container">
    <SideBar />
    <Body />
  </div>,
  root,
);
|
Component 的实现
对于一个视图框架来说,组件就是它的灵魂, 就像函数之于函数式语言,类之于面向对象语言, 没有组件则无法组成复杂的应用.
组件化的思维推荐将一个应用分而治之, 拆分和组合不同级别的组件,这样可以简化应用的开发和维护,让程序更好理解. 从技术上看组件是一个自定义的元素类型,可以声明组件的输入(props)、有自己的生命周期和状态以及方法、最终输出 Virtual-DOM 对象树, 作为应用 Virtual-DOM 树的一个分支存在.
Preact 的自定义组件是基于 Component 类实现的. 对组件来说最基本的就是状态的维护, 这个通过 setState 来实现:
function Component(props, context) {}
Component.prototype.setState = function(update, callback) {
let s = (this._nextState !== this.state && this._nextState) ||
(this._nextState = assign({}, this.state));
if (typeof update !== 'function' || (update = update(s, this.props)))
assign(s, update);
if (this._vnode) {
if (callback) this._renderCallbacks.push(callback);
enqueueRender(this);
}
};
|
enqueueRender 将组件放进一个异步的批执行队列中,这样可以归并频繁的 setState 调用,实现也非常简单:
let q = [];
const defer = typeof Promise == 'function'
? Promise.prototype.then.bind(Promise.resolve())
: setTimeout;
function enqueueRender(c) {
if (!c._dirty && (c._dirty = true) && q.push(c) === 1)
defer(process);
}
function process() {
let p;
q.sort((a, b) => b._depth - a._depth);
while ((p = q.pop()))
if (p._dirty) p.forceUpdate(false);
}
|
Ok, 上面的代码可以看出 setState 本质上是调用 forceUpdate 进行组件重新渲染的,来往下挖一挖 forceUpdate 的实现.
这里暂且忽略 diff, 将 diff 视作一个黑盒,他就是一个 DOM 映射器, 像上面说的 diff 接收两棵 VNode 树, 以及一个 DOM 挂载点, 在比对的过程中它可以会创建、移除或更新组件和 DOM 元素,触发对应的生命周期方法.
Component.prototype.forceUpdate = function(callback) {
let vnode = this._vnode, dom = this._vnode._dom, parentDom = this._parentDom;
if (parentDom) {
const force = callback !== false;
let mounts = [];
dom = diff(parentDom, vnode, vnode, mounts, this._ancestorComponent, force, dom);
if (dom != null && dom.parentNode !== parentDom)
parentDom.appendChild(dom);
commitRoot(mounts, vnode);
}
if (callback) callback();
};
|
在看看 render 方法, 实现跟 forceUpdate 差不多, 都是调用 diff 算法来执行 DOM 更新,只不过由外部指定一个 DOM 容器:
export function render(vnode, parentDom) {
vnode = createElement(Fragment, null, [vnode]);
parentDom.childNodes.forEach(i => i.remove())
let mounts = [];
diffChildren(parentDom, null oldVNode, mounts, vnode, EMPTY_OBJ);
commitRoot(mounts, vnode);
}
|
梳理一下上面的流程:
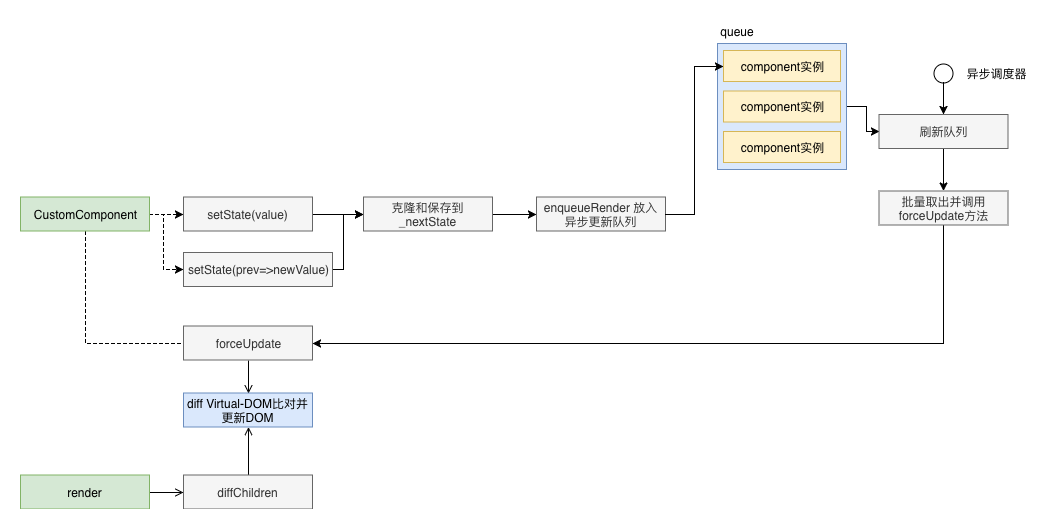
到目前为止没有看到组件的其他功能,如初始化、生命周期函数。这些特性在 diff 函数中定义,也就是说在组件挂载或更新的过程中被调用。下一节就会介绍 diff
diff 算法
千呼万唤始出来,通过上文可以看出,createElement 和 Component 逻辑都很薄, 主要的逻辑还是集中在 diff 函数中. React 将这个过程称为 Reconciliation, 在 Preact 中称为 Differantiate.
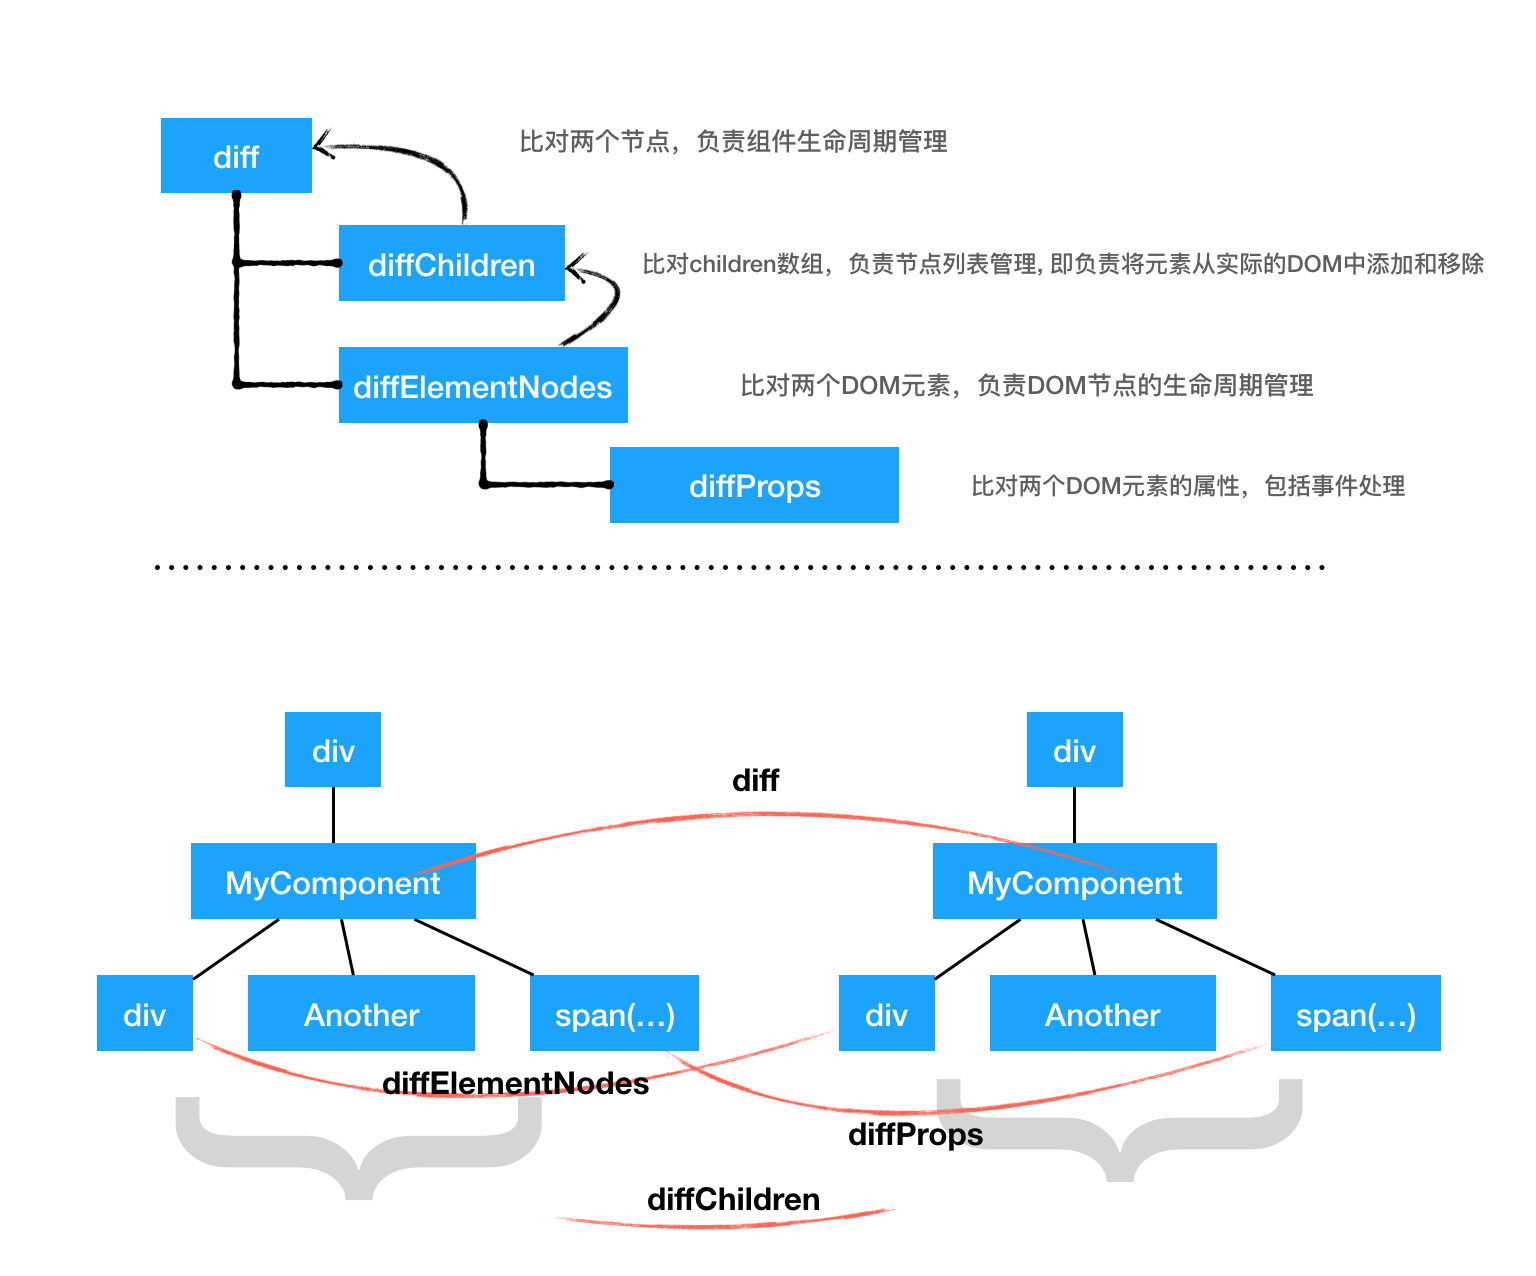
为了简化程序 Preact 的实现将 diff 和 DOM 杂糅在一起, 但逻辑还是很清晰,看下目录结构就知道了:
src/diff
├── children.js # 比对children数组
├── index.js    # 比对两个节点
└── props.js    # 比对两个DOM节点的props
|
在深入 diff 程序之前,先看一下基本的对象结构, 方便后面理解程序流程. 先来看下 VNode 的外形:
type ComponentFactory<P> = preact.ComponentClass<P> | FunctionalComponent<P>;
interface VNode<P = {}> {
type: string | ComponentFactory<P> | null;
props: P & { children: ComponentChildren } | string | number | null;
key: Key
ref: Ref<any> | null;
_children: Array<VNode> | null;
_dom: PreactElement | Text | null;
_lastDomChild: PreactElement | Text | null;
_component: Component | null;
}
|
diffChildren
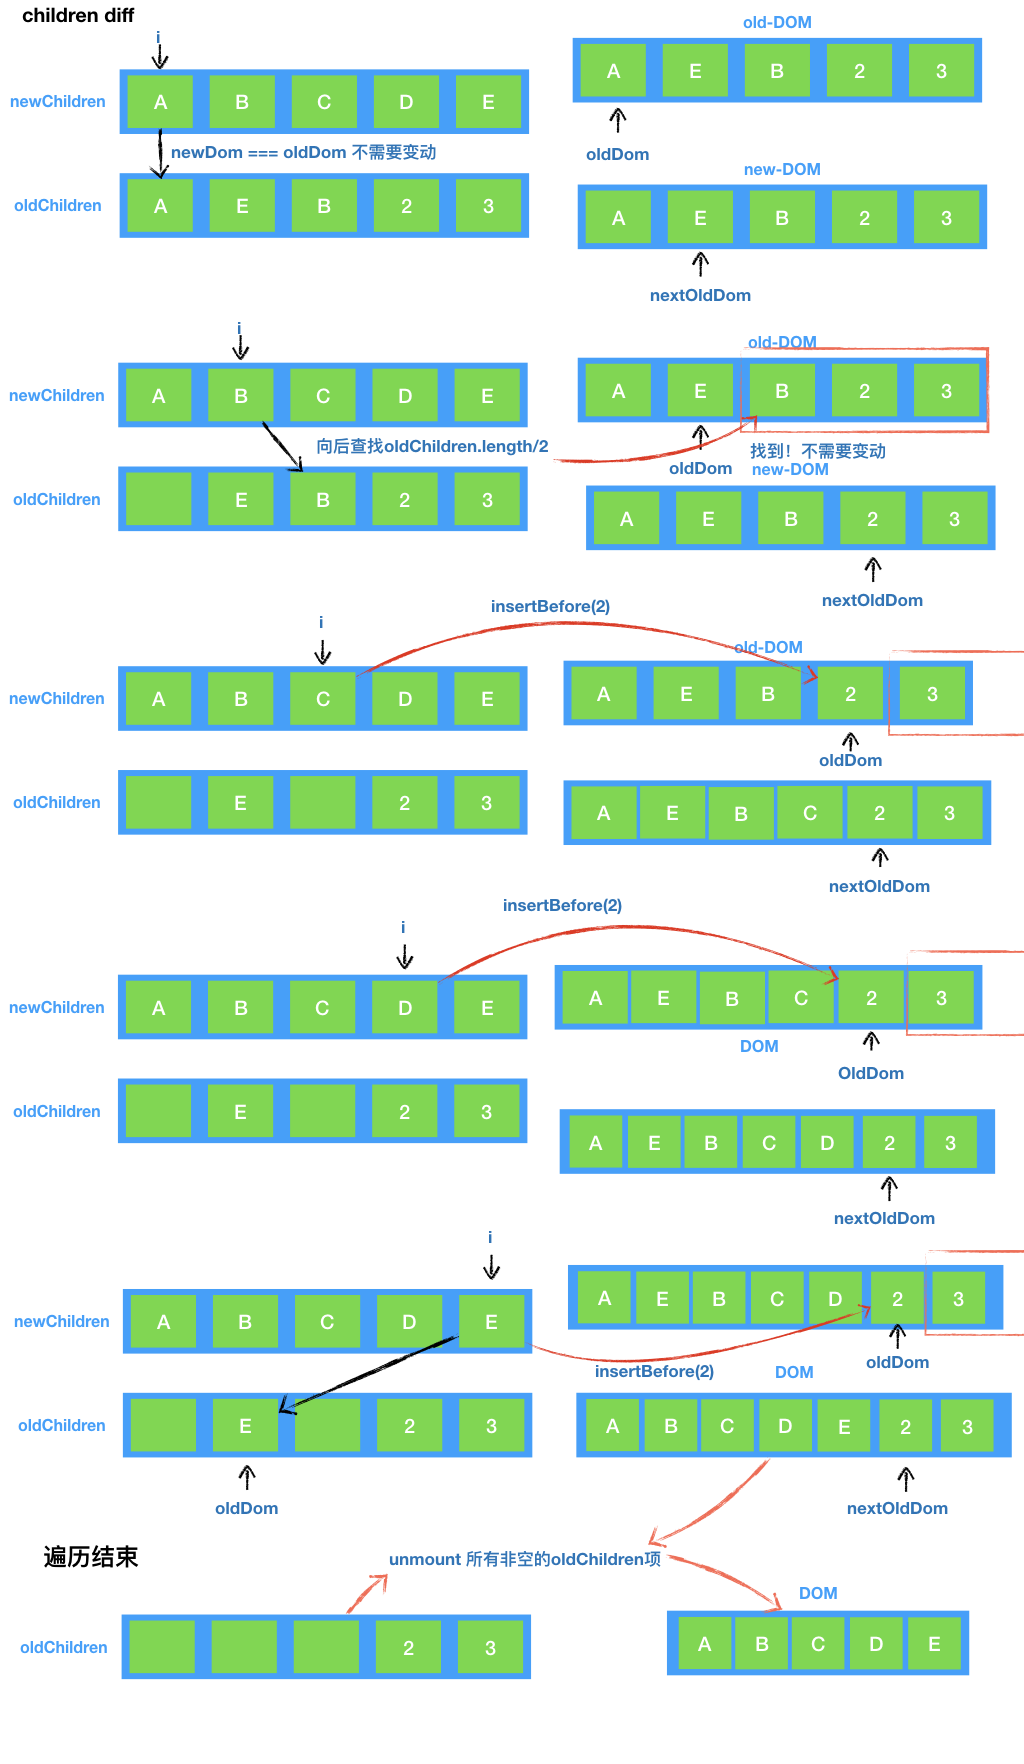
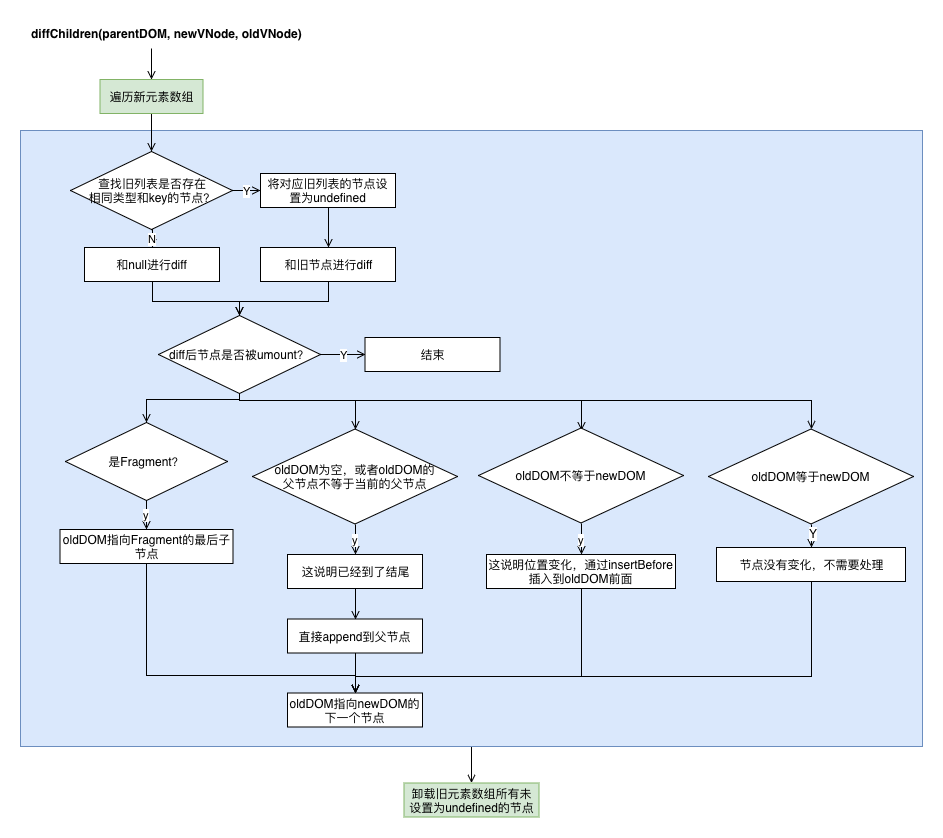
先从最简单的开始, 上面已经猜出 diffChildren 用于比对两个 VNode 列表.

如上图, 首先这里需要维护一个表示当前插入位置的变量 oldDOM, 它一开始指向 DOM childrenNode 的第一个元素, 后面每次插入更新或插入 newDOM,都会指向 newDOM 的下一个兄弟元素.
在遍历 newChildren 列表过程中, 会尝试找出相同 key 的旧 VNode,和它进行 diff. 如果新 VNode 和旧 VNode 位置不一样,这就需要移动它们;对于新增的 DOM,如果插入位置(oldDOM)已经到了结尾,则直接追加到父节点, 否则插入到 oldDOM 之前。
最后卸载旧 VNode 列表中未使用的 VNode.
来详细看看源码:
export function diffChildren(
parentDom, // children的父DOM元素
newParentVNode, // children的新父VNode
oldParentVNode, // children的旧父VNode,diffChildren主要比对这两个Vnode的children
mounts, // 保存在这次比对过程中被挂载的组件实例,在比对后,会触发这些组件的componentDidMount生命周期函数
ancestorComponent, // children的直接父'组件', 即渲染(render)VNode的组件实例
oldDom, // 当前挂载的DOM,对于diffChildren来说,oldDom一开始指向第一个子节点
) {
let newChildren = newParentVNode._children || toChildArray(newParentVNode.props.children, (newParentVNode._children = []), coerceToVNode, true,);
let oldChildren = (oldParentVNode && oldParentVNode._children) || EMPTY_ARR;
for (i = 0; i < newChildren.length; i++) {
childVNode = newChildren[i] = coerceToVNode(newChildren[i]);
if (childVNode == null) continue
oldVNode = oldChildren[i];
for (j = 0; j < oldChildrenLength; j++) {
oldVNode = oldChildren[j];
if (oldVNode && childVNode.key == oldVNode.key && childVNode.type === oldVNode.type) {
oldChildren[j] = undefined;
break;
}
oldVNode = null;
}
newDom = diff(parentDom, childVNode, oldVNode, mounts, ancestorComponent, null, oldDom);
if (newDom != null) {
if (childVNode._lastDomChild != null) {
newDom = childVNode._lastDomChild;
} else if (oldVNode == null || newDom != oldDom || newDom.parentNode == null) {
outer: if (oldDom == null || oldDom.parentNode !== parentDom) {
parentDom.appendChild(newDom);
} else {
for (sibDom = oldDom, j = 0; (sibDom = sibDom.nextSibling) && j < oldChildrenLength; j += 2) {
if (sibDom == newDom)
break outer;
}
parentDom.insertBefore(newDom, oldDom);
}
}
oldDom = newDom.nextSibling;
}
}
for (i = oldChildrenLength; i--; )
if (oldChildren[i] != null) unmount(oldChildren[i], ancestorComponent);
}
|
配图理解一下 diffChilrend 的调用过程:
总结一下流程图
diff
diff 用于比对两个 VNode 节点. diff 函数比较冗长, 但是这里面并没有特别复杂逻辑,主要是一些自定义组件生命周期的处理。所以先上流程图,代码不感兴趣可以跳过.

源代码解析:
export function diff(
parentDom, // 父DOM节点
newVNode, // 新VNode
oldVNode, // 旧VNode
mounts, // 存放已挂载的组件, 将在diff结束后批量处理
ancestorComponent, // 直接父组件
force, // 是否强制更新, 为true将忽略掉shouldComponentUpdate
oldDom, // 当前挂载的DOM节点
) {
try {
outer: if (oldVNode.type === Fragment || newType === Fragment) {
diffChildren(parentDom, newVNode, oldVNode, mounts, ancestorComponent, oldDom);
let i = newVNode._children.length;
if (i && (tmp = newVNode._children[0]) != null) {
newVNode._dom = tmp._dom;
while (i--) {
tmp = newVNode._children[i];
if (newVNode._lastDomChild = tmp && (tmp._lastDomChild || tmp._dom))
break;
}
}
} else if (typeof newType === 'function') {
if (oldVNode._component) {
c = newVNode._component = oldVNode._component;
newVNode._dom = oldVNode._dom;
} else {
if (newType.prototype && newType.prototype.render) {
newVNode._component = c = new newType(newVNode.props, cctx);
} else {
newVNode._component = c = new Component(newVNode.props, cctx);
c.constructor = newType;
c.render = doRender;
}
c._ancestorComponent = ancestorComponent;
c.props = newVNode.props;
if (!c.state) c.state = {};
isNew = c._dirty = true;
c._renderCallbacks = [];
}
c._vnode = newVNode;
if (c._nextState == null) c._nextState = c.state;
if (newType.getDerivedStateFromProps != null)
assign(c._nextState == c.state
? (c._nextState = assign({}, c._nextState))
: c._nextState,
newType.getDerivedStateFromProps(newVNode.props, c._nextState),
);
if (isNew) {
if (newType.getDerivedStateFromProps == null && c.componentWillMount != null) c.componentWillMount();
if (c.componentDidMount != null) mounts.push(c);
} else {
if (newType.getDerivedStateFromProps == null && force == null && c.componentWillReceiveProps != null)
c.componentWillReceiveProps(newVNode.props, cctx);
if (!force && c.shouldComponentUpdate != null && c.shouldComponentUpdate(newVNode.props, c._nextState, cctx) === false) {
c.props = newVNode.props;
c.state = c._nextState;
c._dirty = false;
newVNode._lastDomChild = oldVNode._lastDomChild;
break outer;
}
if (c.componentWillUpdate != null) c.componentWillUpdate(newVNode.props, c._nextState, cctx);
}
oldProps = c.props;
oldState = c.state;
c.props = newVNode.props;
c.state = c._nextState;
let prev = c._prevVNode || null;
c._dirty = false;
let vnode = (c._prevVNode = coerceToVNode(c.render(c.props, c.state)));
if (!isNew && c.getSnapshotBeforeUpdate != null) snapshot = c.getSnapshotBeforeUpdate(oldProps, oldState);
c._depth = ancestorComponent ? (ancestorComponent._depth || 0) + 1 : 0;
c.base = newVNode._dom = diff(parentDom, vnode, prev, mounts, c, null, oldDom);
if (vnode != null) {
newVNode._lastDomChild = vnode._lastDomChild;
}
c._parentDom = parentDom;
if ((tmp = newVNode.ref)) applyRef(tmp, c, ancestorComponent);
while ((tmp = c._renderCallbacks.pop())) tmp.call(c);
if (!isNew && oldProps != null && c.componentDidUpdate != null) c.componentDidUpdate(oldProps, oldState, snapshot);
} else {
newVNode._dom = diffElementNodes(oldVNode._dom, newVNode, oldVNode, mounts, ancestorComponent);
if ((tmp = newVNode.ref) && oldVNode.ref !== tmp) applyRef(tmp, newVNode._dom, ancestorComponent);
}
} catch (e) {
catchErrorInComponent(e, ancestorComponent);
}
return newVNode._dom;
}
|
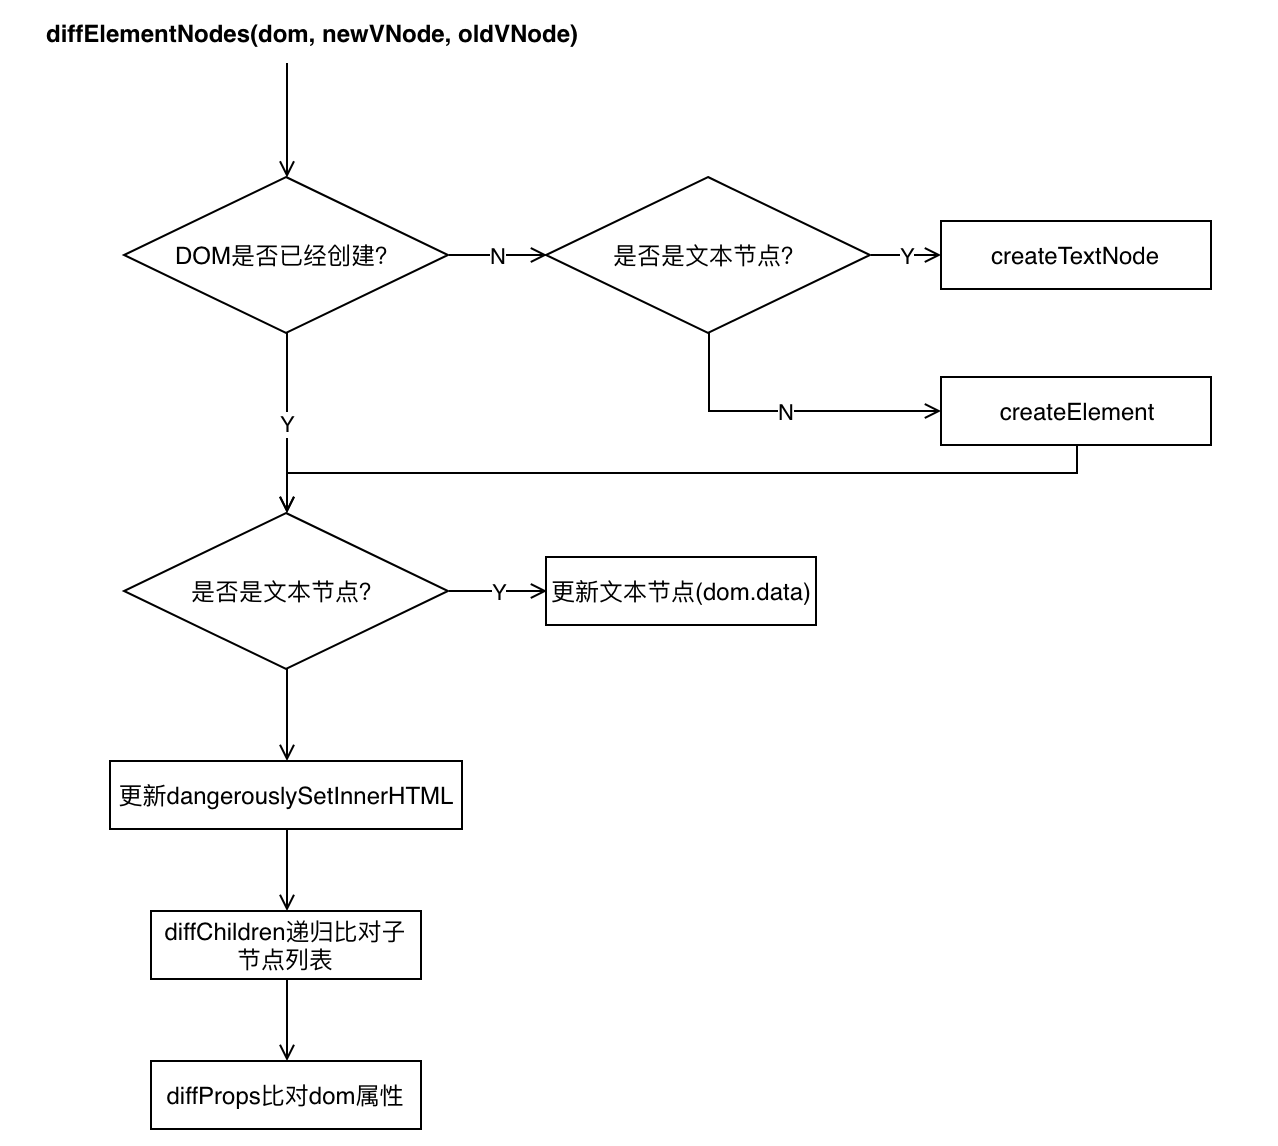
diffElementNodes
比对两个 DOM 元素, 流程非常简单:
function diffElementNodes(dom, newVNode, oldVNode, mounts, ancestorComponent) {
if (dom == null) {
if (newVNode.type === null) {
return document.createTextNode(newProps);
}
dom = document.createElement(newVNode.type);
}
if (newVNode.type === null) {
if (oldProps !== newProps) dom.data = newProps;
} else {
if (newVNode !== oldVNode) {
let oldProps = oldVNode.props || EMPTY_OBJ;
let newProps = newVNode.props;
let oldHtml = oldProps.dangerouslySetInnerHTML;
let newHtml = newProps.dangerouslySetInnerHTML;
if (newHtml || oldHtml)
if (!newHtml || !oldHtml || newHtml.__html != oldHtml.__html)
dom.innerHTML = (newHtml && newHtml.__html) || '';
diffChildren(dom, newVNode, oldVNode, context, mounts, ancestorComponent, EMPTY_OBJ);
diffProps(dom, newProps, oldProps, isSvg);
}
}
return dom;
}
|
diffProps
diffProps 用于更新 DOM 元素的属性
export function diffProps(dom, newProps, oldProps, isSvg) {
let i;
const keys = Object.keys(newProps).sort();
for (i = 0; i < keys.length; i++) {
const k = keys[i];
if (k !== 'children' && k !== 'key' &&
(!oldProps || (k === 'value' || k === 'checked' ? dom : oldProps)[k] !== newProps[k]))
setProperty(dom, k, newProps[k], oldProps[k], isSvg);
}
for (i in oldProps)
if (i !== 'children' && i !== 'key' && !(i in newProps))
setProperty(dom, i, null, oldProps[i], isSvg);
}
|
diffProps 实现比较简单,就是遍历一下属性有没有变动,有变动则通过 setProperty 设置属性。对于失效的 props 也会通过 setProperty 置空。这里面稍微有点复杂的是 setProperty. 这里涉及到事件的处理, 命名的转换等等:
function setProperty(dom, name, value, oldValue, isSvg) {
if (name === 'style') {
const set = assign(assign({}, oldValue), value);
for (let i in set) {
if ((value || EMPTY_OBJ)[i] === (oldValue || EMPTY_OBJ)[i]) continue;
dom.style.setProperty(
i[0] === '-' && i[1] === '-' ? i : i.replace(CAMEL_REG, '-$&'),
value && i in value
? typeof set[i] === 'number' && IS_NON_DIMENSIONAL.test(i) === false
? set[i] + 'px'
: set[i]
: '', // 清空
);
}
} else if (name[0] === 'o' && name[1] === 'n') {
let useCapture = name !== (name = name.replace(/Capture$/, ''));
let nameLower = name.toLowerCase();
name = (nameLower in dom ? nameLower : name).slice(2);
if (value) {
if (!oldValue) dom.addEventListener(name, eventProxy, useCapture);
} else {
dom.removeEventListener(name, eventProxy, useCapture);
}
(dom._listeners || (dom._listeners = {}))[name] = value;
} else if (name !== 'list' && name !== 'tagName' && name in dom) {
dom[name] = value == null ? '' : value;
} else if (
typeof value !== 'function' &&
name !== 'dangerouslySetInnerHTML'
) {
if (value == null || value === false) {
dom.removeAttribute(name);
} else {
dom.setAttribute(name, value);
}
}
}
|
OK 至此 Diff 算法介绍完毕,其实这里面的逻辑并不是特别复杂, 当然 Preact 只是一个极度精简的框架,React 复杂度要高得多,尤其 React Fiber 重构之后。你也可以把 Preact 当做 React 的历史回顾,有兴趣再深入了解 React 的最新架构。
Hooks 的实现
React16.8 正式引入的 hooks,这玩意带来了全新的 React 组件开发方式,让代码变得更加简洁。 React hooks: not magic, just arrays这篇文章已经揭示了 hooks 的基本实现原理, 它不过是基于数组实现的。preact 也实现了 hooks 机制,实现代码也就百来行,让我们来体会体会.
hooks 功能本身是没有集成在 Preact 代码库内部的,而是通过preact/hooks导入
import { h } from 'preact';
import { useEffect } from 'preact/hooks';
function Foo() {
  useEffect(() => {
    console.log('mounted');
  }, []);
  return <div>hello hooks</div>;
}
|
那 Preact 是如何扩展 diff 算法来实现 hooks 的呢? 实际上 Preact 提供了options对象来对 Preact diff 进行扩展,options 类似于 Preact 生命周期钩子,在 diff 过程中被调用(为了行文简洁,上面的代码我忽略掉了)。例如:
export function diff(/*...*/) {
if ((tmp = options.diff)) tmp(newVNode);
try {
outer: if (oldVNode.type === Fragment || newType === Fragment) {
} else if (typeof newType === 'function') {
if ((tmp = options.render)) tmp(newVNode);
try {
c.render(c.props, c.state, c.context),
} catch (e) {
if ((tmp = options.catchRender) && tmp(e, c)) return;
throw e;
}
} else {
}
if ((tmp = options.diffed)) tmp(newVNode);
} catch (e) {
catchErrorInComponent(e, ancestorComponent);
}
return newVNode._dom;
}
|
useState
先从最常用的 useState 开始:
export function useState(initialState) {
const hookState = getHookState(currentIndex++);
if (!hookState._component) {
hookState._component = currentComponent;
hookState._value = [
typeof initialState === 'function' ? initialState() : initialState,
value => {
const nextValue = typeof value === 'function' ? value(hookState._value[0]) : value;
if (hookState._value[0] !== nextValue) {
hookState._value[0] = nextValue;
hookState._component.setState({});
}
},
];
}
return hookState._value;
}
|
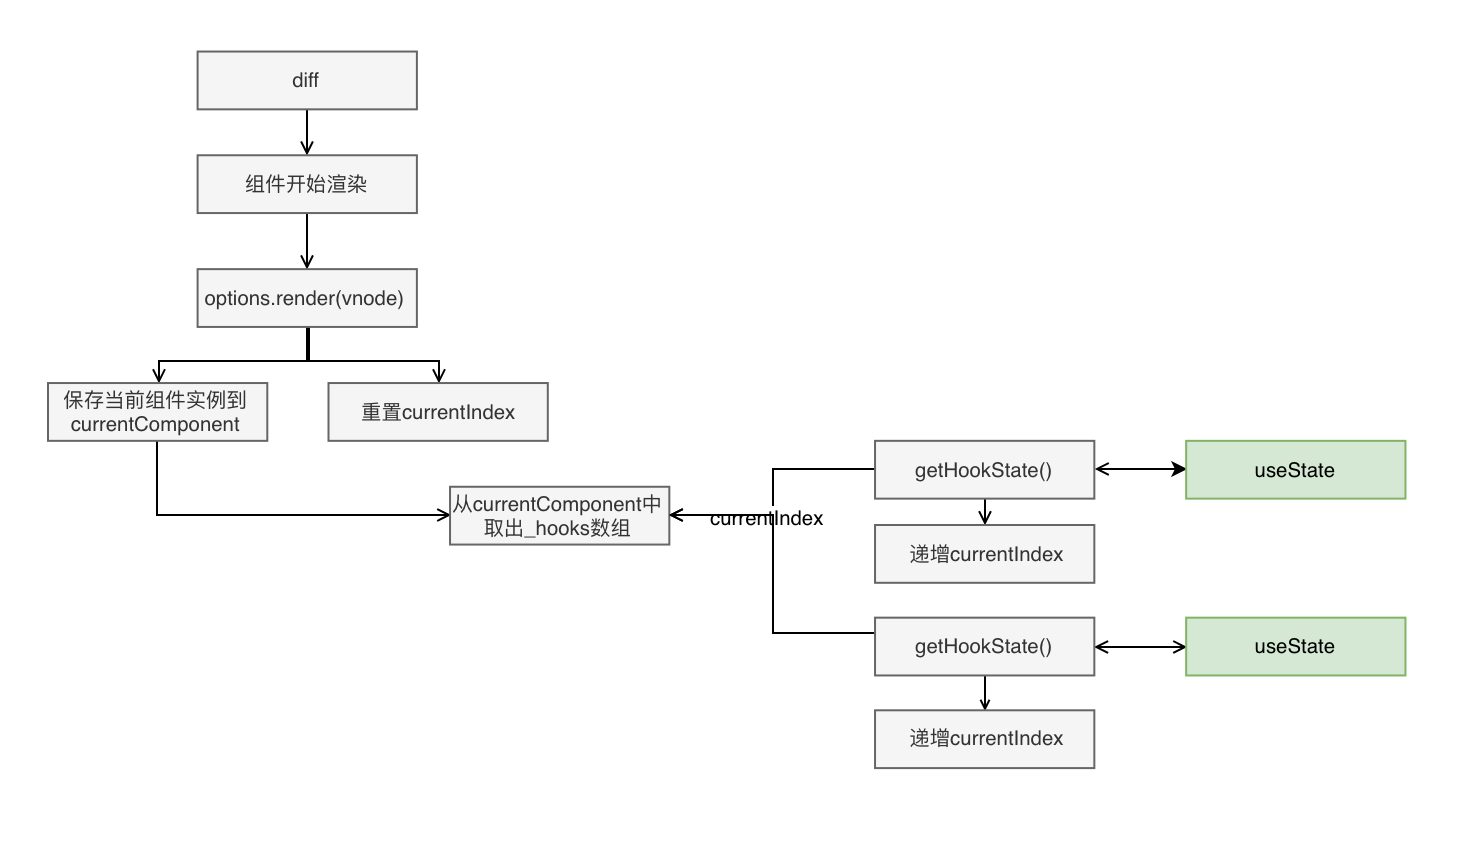
从代码可以看到,关键在于getHookState的实现
import { options } from 'preact';
let currentIndex;
let currentComponent;
options.render = vnode => {
currentComponent = vnode._component;
currentIndex = 0;
if (currentComponent.__hooks) {
currentComponent.__hooks._pendingEffects = handleEffects(
currentComponent.__hooks._pendingEffects,
);
}
};
function getHookState(index) {
const hooks = currentComponent.__hooks ||
(currentComponent.__hooks = {
_list: [],
_pendingEffects: [],
_pendingLayoutEffects: [],
});
if (index >= hooks._list.length) {
hooks._list.push({});
}
return hooks._list[index];
}
|
大概的流程如下:
useEffect
再看看 useEffect 和 useLayoutEffect. useEffect 和 useLayouteEffect 差不多, 只是触发 effect 的时机不一样,useEffect 在完成渲染后绘制触发,而 useLayoutEffect 在 diff 完成后触发:
export function useEffect(callback, args) {
const state = getHookState(currentIndex++);
if (argsChanged(state._args, args)) {
state._value = callback;
state._args = args;
currentComponent.__hooks._pendingEffects.push(state);
afterPaint(currentComponent);
}
}
export function useLayoutEffect(callback, args) {
const state = getHookState(currentIndex++);
if (argsChanged(state._args, args)) {
state._value = callback;
state._args = args;
currentComponent.__hooks._pendingLayoutEffects.push(state);
}
}
|
看看如何触发 effect. useEffect 和上面看到的enqueueRender差不多,放进一个异步队列中,由requestAnimationFrame进行调度,批量处理:
afterPaint = component => {
if (!component._afterPaintQueued &&
(component._afterPaintQueued = true) &&
afterPaintEffects.push(component) === 1
)
requestAnimationFrame(scheduleFlushAfterPaint);
};
function scheduleFlushAfterPaint() {
setTimeout(flushAfterPaintEffects);
}
function flushAfterPaintEffects() {
afterPaintEffects.some(component => {
component._afterPaintQueued = false;
if (component._parentDom)
component.__hooks._pendingEffects = handleEffects(component.__hooks._pendingEffects);
});
afterPaintEffects = [];
}
function handleEffects(effects) {
effects.forEach(invokeCleanup);
effects.forEach(invokeEffect);
return [];
}
function invokeCleanup(hook) {
if (hook._cleanup) hook._cleanup();
}
function invokeEffect(hook) {
const result = hook._value();
if (typeof result === 'function') hook._cleanup = result;
}
|
再看看如何触发 LayoutEffect, 很简单,在 diff 完成后触发, 这个过程是同步的.
options.diffed = vnode => {
  const c = vnode._component;
  if (!c) return;
  const hooks = c.__hooks;
  if (hooks) {
    hooks._pendingLayoutEffects = handleEffects(hooks._pendingLayoutEffects);
  }
};
|
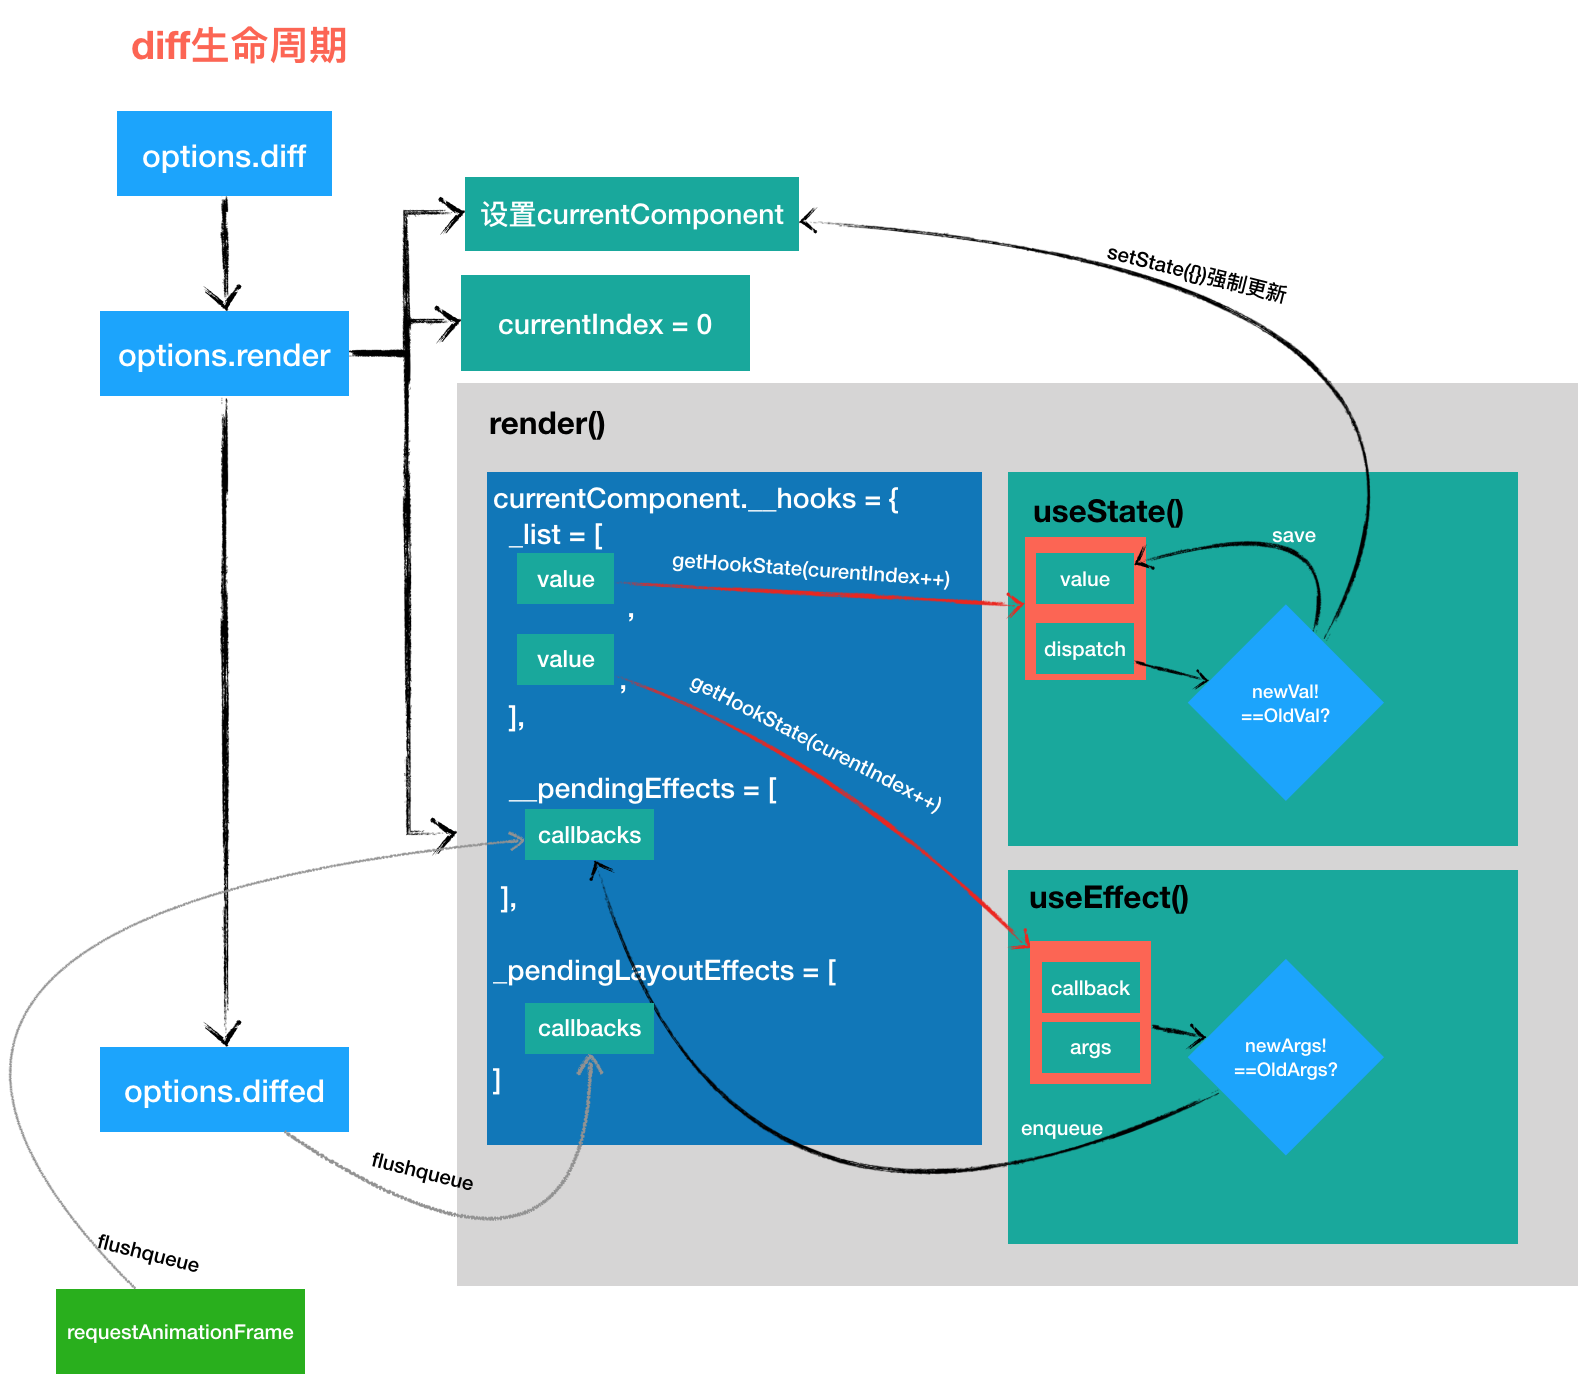
👌,hooks 基本原理基本了解完毕, 最后还是用一张图来总结一下吧。
技术地图
文章篇幅很长,主要是太多代码了, 我自己也不喜欢看这种文章,所以没期望读者会看到这里. 后面文章再想办法改善改善. 谢谢你阅读到这里。
本期的主角本身是一个小而美的视图框架,没有其他技术栈. 这里就安利一下 Preact 作者developit的另外一些小而美的库吧.
扩展