上个月蚂蚁金服前端发布了一个新的框架 Remax, 口号是使用真正的、完整的 React 来开发小程序.
对于原本的 React 开发者来说 ‘Learn once, write anywhere’ , 和 ReactNative 开发体验差不多,而对于小程序来说则是全新的开发体验。
Taro号称是‘类React’的开发方案,但是它是使用静态编译的方式实现,边柳 在它的 《Remax - 使用真正的 React 构建小程序》文章中也提到了这一点:
所谓静态编译,就是使用工具把代码语法分析一遍,把其中的 JSX 部分和逻辑部分抽取出来,分别生成小程序的模板和 Page 定义。
这种方案实现起来比较复杂,且运行时并没有 React 存在。
相比而言,Remax 的解决方案就简单很多,它不过就是新的React渲染器.

因为 Remax 刚发布不久,核心代码比较简单,感兴趣的可以去 github 观摩贡献
可以通过 CodeSandbox 游乐场试玩自定义Renderer: Edit react-custom-renderer
文章看起来比较长,好戏在后头,一步一步来 🦖
文章大纲
关于React的一些基本概念
创建一个 React 自定义渲染器,你需要对React渲染的基本原理有一定的了解。所以在深入阅读本文之前,先要确保你能够理解以下几个基本概念:
1. Element
我们可以通过 JSX 或者 React.createElement 来创建 Element,用来描述我们要创建的视图节点。比如:
<button class='button button-blue'>
  <b>
    OK!
  </b>
</button>
|
JSX 会被转义译为:
React.createElement(
  "button",
  { class: 'button button-blue' },
  React.createElement("b", null, "OK!")
)
|
React.createElement 最终构建出类似这样的对象:
{
  type: 'button',
  props: {
    className: 'button button-blue',
    children: {
      type: 'b',
      props: {
        children: 'OK!'
      }
    }
  }
}
|
也就是说 Element 就是一个普通的对象,描述用户创建的节点类型、props 以及 children。这些 Elements 组合成树,描述用户视图
2. Component
可以认为是 Element 的类型,它有两种类型:
const DeleteAccount = () => (
  <div>
    <p>Are you sure?</p>
    <DangerButton>Yep</DangerButton>
    <Button color='blue'>Cancel</Button>
  </div>
);
|
3. Instance
当 React 开始渲染一个 Element 时,会根据组件类型为它创建一个‘实例’,例如类组件,会调用new操作符实例化。这个实例会一直引用,直到 Element 从 Element Tree 中被移除。
首次渲染: React 会实例化一个 MyButton 实例,调用挂载相关的生命周期方法,并执行 render 方法,递归渲染下级
render(<MyButton>foo</MyButton>, container)
|
更新: 因为组件类型没有变化,React 不会再实例化,这个属于‘节点更新’,React 会执行更新相关的生命周期方法,如shouldComponentUpdate。如果需要更新则再次执行render方法
render(<MyButton>bar</MyButton>, container)
|
卸载: 组件类型不一样了, 原有的 MyButton 被替换. MyButton 的实例将要被销毁,React 会执行卸载相关的生命周期方法,如componentWillUnmount
render(<button>bar</button>, container)
|
4. Reconciler & Renderer
Reconciler 和 Renderer 的关系可以通过下图缕清楚.
Reconciler 的职责是维护 VirtualDOM 树,内部实现了 Diff/Fiber 算法,决定什么时候更新、以及要更新什么
而 Renderer 负责具体平台的渲染工作,它会提供宿主组件、处理事件等等。例如ReactDOM就是一个渲染器,负责DOM节点的渲染和DOM事件处理。

5. Fiber 的两个阶段
React 使用了 Fiber 架构之后,更新过程被分为两个阶段(Phase)
- 协调阶段(Reconciliation Phase) 这个阶段 React 会找出需要更新的节点。这个阶段是可以被打断的,比如有优先级更高的事件要处理时。
- 提交阶段(Commit Phase) 将上一个阶段计算出来的需要处理的副作用(Effects)一次性执行了。这个阶段必须同步执行,不能被打断
如果按照render为界,可以将生命周期函数按照两个阶段进行划分:
- 协调阶段
constructorcomponentWillMount 废弃componentWillReceiveProps 废弃static getDerivedStateFromPropsshouldComponentUpdatecomponentWillUpdate 废弃rendergetSnapshotBeforeUpdate()
- 提交阶段
componentDidMountcomponentDidUpdatecomponentWillUnmount
没理解?那么下文读起来对你可能比较吃力,建议阅读一些关于React基本原理的相关文章。
就目前而言,React 大部分核心的工作已经在 Reconciler 中完成,好在 React 的架构和模块划分还比较清晰,React官方也暴露了一些库,这极大简化了我们开发 Renderer 的难度。开始吧!
自定义React渲染器
React官方暴露了一些库供开发者来扩展自定义渲染器:
需要注意的是,这些包还是实验性的,API可能不太稳定。另外,没有详细的文档,你需要查看源代码或者其他渲染器实现;本文以及扩展阅读中的文章也是很好的学习资料。
创建一个自定义渲染器只需两步:

第一步: 实现宿主配置,这是react-reconciler要求宿主提供的一些适配器方法和配置项。这些配置项定义了如何创建节点实例、构建节点树、提交和更新等操作。下文会详细介绍这些配置项
const Reconciler = require('react-reconciler');
const HostConfig = {
};
|
第二步:实现渲染函数,类似于ReactDOM.render() 方法
const MyRenderer = Reconciler(HostConfig);
export function render(element, container, callback) {
if (!container._rootContainer) {
container._rootContainer = ReactReconcilerInst.createContainer(container, false);
}
return ReactReconcilerInst.updateContainer(element, container._rootContainer, null, callback);
}
|
容器既是 React 组件树挂载的目标(例如 ReactDOM 我们通常会挂载到 #root 元素,#root 就是一个容器)、也是组件树的 根Fiber节点(FiberRoot)。根节点是整个组件树的入口,它将会被 Reconciler 用来保存一些信息,以及管理所有节点的更新和渲染。
关于 Fiber 架构的一些细节可以看这些文章:
HostConfig 渲染器适配
HostConfig 支持非常多的参数,完整列表可以看这里. 下面是一些自定义渲染器必须提供的参数:
interface HostConfig {
getRootHostContext(rootContainerInstance: Container): HostContext;
getChildHostContext(parentHostContext: HostContext, type: Type, rootContainerInstance: Container): HostContext;
createInstance(type: Type, props: Props, rootContainerInstance: Container, hostContext: HostContext, internalInstanceHandle: OpaqueHandle,): Instance;
createTextInstance(text: string, rootContainerInstance: Container, hostContext: HostContext, internalInstanceHandle: OpaqueHandle): TextInstance;
shouldSetTextContent(type: Type, props: Props): boolean;
appendInitialChild(parentInstance: Instance, child: Instance | TextInstance): void;
appendChild?(parentInstance: Instance, child: Instance | TextInstance): void;
appendChildToContainer?(container: Container, child: Instance | TextInstance): void;
insertBefore?(parentInstance: Instance, child: Instance | TextInstance, beforeChild: Instance | TextInstance): void;
insertInContainerBefore?(container: Container, child: Instance | TextInstance, beforeChild: Instance | TextInstance,): void;
removeChild?(parentInstance: Instance, child: Instance | TextInstance): void;
removeChildFromContainer?(container: Container, child: Instance | TextInstance): void;
finalizeInitialChildren(parentInstance: Instance, type: Type, props: Props, rootContainerInstance: Container, hostContext: HostContext): boolean;
commitMount?(instance: Instance, type: Type, newProps: Props, internalInstanceHandle: OpaqueHandle): void;
prepareUpdate(instance: Instance, type: Type, oldProps: Props, newProps: Props, rootContainerInstance: Container, hostContext: HostContext,): null | UpdatePayload;
commitTextUpdate?(textInstance: TextInstance, oldText: string, newText: string): void;
commitUpdate?(instance: Instance, updatePayload: UpdatePayload, type: Type, oldProps: Props, newProps: Props, internalInstanceHandle: OpaqueHandle): void;
resetTextContent?(instance: Instance): void;
prepareForCommit(containerInfo: Container): void;
resetAfterCommit(containerInfo: Container): void;
now(): number;
setTimeout(handler: (...args: any[]) => void, timeout: number): TimeoutHandle | NoTimeout;
clearTimeout(handle: TimeoutHandle | NoTimeout): void;
noTimeout: NoTimeout;
shouldDeprioritizeSubtree(type: Type, props: Props): boolean;
scheduleDeferredCallback(callback: () => any, options?: { timeout: number }): any;
cancelDeferredCallback(callbackID: any): void;
supportsMutation: boolean;
supportsPersistence: boolean;
supportsHydration: boolean;
getPublicInstance(instance: Instance | TextInstance): PublicInstance;
}
|
如果按照Fiber的两个阶段来划分的话,接口分类是这样的:
| 协调阶段                 | 开始提交         | 提交阶段                  | 提交完成         |
|-------------------------|----------------|--------------------------|-----------------|
| createInstance          | prepareCommit  | appendChild              | resetAfterCommit|
| createTextInstance      |                | appendChildToContainer   | commitMount     |
| shouldSetTextContent    |                | insertBefore             |                 |
| appendInitialChild      |                | insertInContainerBefore  |                 |
| finalizeInitialChildren  |                | removeChild              |                 |
| prepareUpdate           |                | removeChildFromContainer |                 |
|                         |                | commitTextUpdate         |                 |
|                         |                | commitUpdate             |                 |
|                         |                | resetTextContent         |                 |
|
通过上面接口定义可以知道 HostConfig 配置比较丰富,涉及节点操作、挂载、更新、调度、以及各种生命周期钩子, 可以控制渲染器的各种行为.
看得有点蒙圈?没关系, 你暂时没有必要了解所有的参数,下面会一点一点展开解释这些功能。你可以最后再回来看这里。
宿主组件
React中有两种组件类型,一种是宿主组件(Host Component), 另一种是复合组件(CompositeComponent). 宿主组件是平台提供的,例如 ReactDOM 平台提供了 div、span、h1… 等组件. 这些组件通常是字符串类型,直接渲染为平台下面的视图节点。
而复合组件,也称为自定义组件,用于组合其他复合组件和宿主组件,通常是类或函数。
渲染器不需要关心复合组件的处理, Reconciler 交给渲染器的是一颗宿主组件树。
当然在 Remax 中,也定义了很多小程序特定的宿主组件,比如我们可以这样子使用它们:
function MyComp() {
  return <view><text>hello world</text></view>
}
|
Reconciler 会调用 HostConfig 的 createInstance 和createTextInstance 来创建宿主组件的实例,所以自定义渲染器必须实现这两个方法. 看看 Remax 是怎么做的:
const HostConfig = {
createInstance(type: string, newProps: any, container: Container) {
const id = generate();
const props = processProps(newProps, container, id);
return new VNode({
id,
type,
props,
container,
});
},
createTextInstance(text: string, container: Container) {
const id = generate();
const node = new VNode({
id,
type: TYPE_TEXT,
props: null,
container,
});
node.text = text;
return node;
},
shouldSetTextContent(type, nextProps) {
return false
}
}
|
在 ReactDOM 中上面两个方法分别会通过 document.createElement 和 document.createTextNode 来创建宿主组件(即DOM节点)。

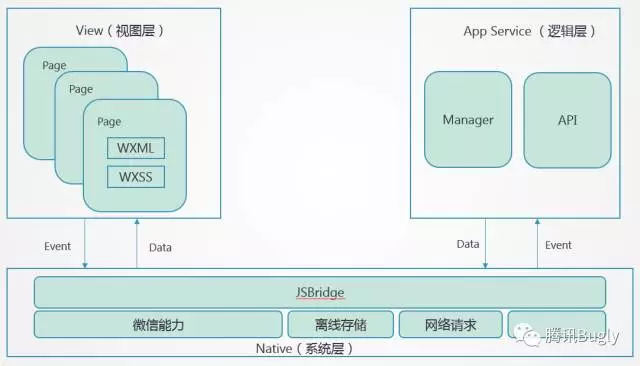
上面是微信小程序的架构图(图片来源: 一起脱去小程序的外套 - 微信小程序架构解析)。
因为小程序隔离了渲染进程和逻辑进程。Remax 是跑在逻辑进程上的,在逻辑进程中无法进行实际的渲染, 只能通过setData方式将更新指令传递给渲染进程后,再进行解析渲染。
所以Remax选择在逻辑进程中先构成一颗镜像树(Mirror Tree), 然后再同步到渲染进程中,如下图:

上面的 VNode 就是镜像树中的虚拟节点,主要用于保存一些节点信息,不做任何特殊处理, 它的结构如下:
export default class VNode {
id: number;
container: Container;
children: VNode[];
mounted = false;
type: string | symbol;
props?: any;
parent: VNode | null = null;
text?: string;
path(): Path
appendChild(node: VNode, immediately: boolean)
removeChild(node: VNode, immediately: boolean)
insertBefore(newNode: VNode, referenceNode: VNode, immediately: boolean)
update()
toJSON(): string
}
|
VNode 的完整代码可以看这里
镜像树的构建和操作
要构建出完整的节点树需要实现HostConfig 的 appendChild、insertBefore、removeChild 等方法, 如下, 这些方法都比较容易理解,所以不需要过多解释。
const HostConfig = {
supportsMutation: true,
appendInitialChild: (parent: VNode, child: VNode) => {
parent.appendChild(child, false);
},
appendChild(parent: VNode, child: VNode) {
parent.appendChild(child, false);
},
insertBefore(parent: VNode, child: VNode, beforeChild: VNode) {
parent.insertBefore(child, beforeChild, false);
},
removeChild(parent: VNode, child: VNode) {
parent.removeChild(child, false);
},
appendChildToContainer(container: any, child: VNode) {
container.appendChild(child);
child.mounted = true;
},
insertInContainerBefore(container: any, child: VNode, beforeChild: VNode) {
container.insertBefore(child, beforeChild);
},
removeChildFromContainer(container: any, child: VNode) {
container.removeChild(child);
},
}
|
节点更新
上一节讲的是树结构层面的更新,当节点属性变动或者文本内容变动时,也需要进行更新。我们可以通过下列 HostConfig 配置来处理这类更新:
const HostConfig = {
prepareUpdate(node: VNode, type: string, oldProps: any, newProps: any) {
oldProps = processProps(oldProps, node.container, node.id);
newProps = processProps(newProps, node.container, node.id);
if (!shallowequal(newProps, oldProps)) {
return true;
}
return null;
},
commitUpdate(
node: VNode,
updatePayload: any,
type: string,
oldProps: any,
newProps: any
) {
node.props = processProps(newProps, node.container, node.id);
node.update();
},
commitTextUpdate(node: VNode, oldText: string, newText: string) {
if (oldText !== newText) {
node.text = newText;
node.update();
}
},
}
|
Ok, 这个也比较好理解。
对于普通节点更新,Reconciler 会先调用 prepareUpdate, 确定是否要更新,如果返回非空数据,Reconciler 就会将节点放入 Effects 链中,在提交阶段调用 commitUpdate 来执行更新。
文本节点更新则直接调用 commitTextUpdate,不在话下.
副作用提交
React 的更新的两个阶段这个概念非常重要,这个也体现在HostConfig上:
const HostConfig = {
prepareForCommit: () => {},
resetAfterCommit: () => {},
finalizeInitialChildren: () => false,
commitMount: () => {},
}
|
将上文讲到的所有钩子都聚合起来,按照更新的阶段和应用的目标(target)进行划分,它们的分布是这样的:

那么对于 Remax 来说, 什么时候应该将’更新’提交到渲染进程呢?答案是上图所有在提交阶段的方法被调用时。
提交阶段原意就是用于执行各种副作用的,例如视图更新、远程方法请求、订阅… 所以 Remax 也会在这个阶段收集更新指令,在下一个循环推送给渲染进程。
HostConfig执行流程总结
回顾一下自定义渲染器各种方法调用的流程, 首先看一下挂载的流程:
假设我们的组件结构如下:
const container = new Container()
const MyComp = () => {
  return (
    <div>
      <span>hello world</span>
    </div>
  )
}

render(
  <div className="root">
    <MyComp />
    <span>--custom renderer</span>
  </div>,
  container,
  () => {
    console.log("rendered")
  },
)
|
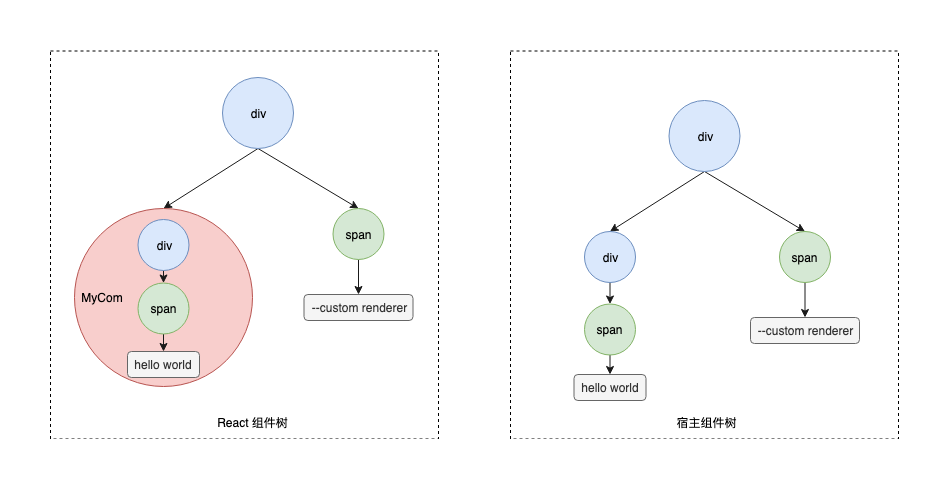
React 组件树的结构如下(左图),但对于渲染器来说,树结构是右图。
自定义组件是React 层级的东西,渲染器只需要关心最终需要渲染的视图结构, 换句话说渲染器只关心宿主组件:

挂载会经历以下流程:

通过上面的流程图,可以很清晰看到每个钩子的调用时机。
同理,我们再来看一下节点更新时的流程. 我们稍微改造一下上面的程序,让它定时触发更新:
const MyComp = () => {
const [count, setCount] = useState(1)
const isEven = count % 2 === 0
useEffect(() => {
const timer = setInterval(() => {
setCount(c => c + 1)
}, 10000)
return () => clearInterval(timer)
}, [])
return (
<div className="mycomp" style={{ color: isEven ? "red" : "blue" }}>
{isEven ? <div>even</div> : null}
<span className="foo">hello world {count}</span>
</div>
)
}
|
下面是更新的流程:

当MyComp的 count 由1变为2时,MyComp 会被重新渲染,这时候新增了一个div 节点(红色虚框), 另外 hello world 1 也变成了 hello world 2。
新增的 div 节点创建流程和挂载时一样,只不过它不会立即插入到父节点中,而是先放到Effect链表中,在提交阶段统一执行。
同理hello world {count}文本节点的更新、以及其他节点的 Props 更新都是放到Effect链表中,最后时刻才更新提交. 如上图的 insertBefore、commitTextUpdate、commitUpdate.
另外一个比较重要的是 prepareUpdate 钩子,你可以在这里告诉 Reconciler,节点是否需要更新,如果需要更新则返回非空值,这样 commitUpdate 才会被触发。
同步到渲染进程
React 自定义渲染器差不多就这样了,接下来就是平台相关的事情了。
Remax 目前的做法是在触发更新后,通过小程序 Page 对象的 setData 方法将更新指令传递给渲染进程;
渲染进程侧再通过 WXS 机制,将更新指令恢复到树中; 最后再通过模板机制,将树递归渲染出来。
整体的架构如下:

先来看看逻辑进程侧是如何推送更新指令的:
export default class Container {
requestUpdate(
path: Path,
start: number,
deleteCount: number,
immediately: boolean,
...items: RawNode[]
) {
const update: SpliceUpdate = {
path,
start,
deleteCount,
items,
};
if (immediately) {
this.updateQueue.push(update);
this.applyUpdate();
} else {
if (this.updateQueue.length === 0) {
setTimeout(() => this.applyUpdate());
}
this.updateQueue.push(update);
}
}
applyUpdate() {
const action = {
type: 'splice',
payload: this.updateQueue.map(update => ({
path: stringPath(update.path),
start: update.start,
deleteCount: update.deleteCount,
item: update.items[0],
})),
};
this.context.setData({ action });
this.updateQueue = [];
}
}
|
逻辑还是比较清楚的,即将需要更新的节点(包含节点路径、节点信息)推入更新队列,然后触发 setData 通知到渲染进程。
渲染进程侧,则需要通过 WXS 机制,相对应地将更新指令恢复到渲染树中:
var tree = {
root: {
children: [],
},
};
function reduce(action) {
switch (action.type) {
case 'splice':
for (var i = 0; i < action.payload.length; i += 1) {
var value = get(tree, action.payload[i].path);
if (action.payload[i].item) {
value.splice(
action.payload[i].start,
action.payload[i].deleteCount,
action.payload[i].item
);
} else {
value.splice(action.payload[i].start, action.payload[i].deleteCount);
}
set(tree, action.payload[i].path, value);
}
return tree;
default:
return tree;
}
}
|
OK, 接着开始渲染, Remax 采用了模板的形式进行渲染:
<wxs src="../../helper.wxs" module="helper" />
<import src="../../base.wxml"/>
<template is="REMAX_TPL" data="{{tree: helper.reduce(action)}}" />
|
Remax 为每个组件类型都生成了一个template,动态’递归’渲染整颗树:
<template name="REMAX_TPL">
<block wx:for="{{tree.root.children}}" wx:key="{{id}}">
<template is="REMAX_TPL_1_CONTAINER" data="{{i: item}}" />
</block>
</template>
<wxs module="_h">
module.exports = {
v: function(value) {
return value !== undefined ? value : '';
}
};
</wxs>
<% for (var i = 1; i <= depth; i++) { %>
<%var id = i; %>
<% for (let component of components) { %>
<%- include('./component.ejs', {
props: component.props,
id: component.id,
templateId: id,
}) %>
<% } %>
<template name="REMAX_TPL_<%=id%>_plain-text" data="{{i: i}}">
<block>{{i.text}}</block>
</template>
<template name="REMAX_TPL_<%=id%>_CONTAINER" data="{{i: i}}">
<template is="{{'REMAX_TPL_<%=id%>_' + i.type}}" data="{{i: i}}" />
</template>
<% } %>
|
限于小程序的渲染机制,以下因素可能会影响渲染的性能:
- 进程IPC。更新指令通过IPC通知到渲染进程,频繁更新可能会影响性能. ReactNative 中涉及到 Native 和 JS引擎之间的通信,也是存在这个问题的。
所以小程序才有了 WXS 这类方案,用来处理复杂的视图交互问题,比如动画。未来 Remax 也需要考虑这个问题
Reconciler这一层已经进行了 Diff,到渲染进程可能需要重复再做一遍?- 基于模板的方案,局部更新是否会导致页面级别重新渲染?和小程序原生的自定义组件相比性能如何?
总结
本文以 Remax 为例,科普一个 React 自定义渲染器是如何运作的。对于 Remax,目前还处于开发阶段,很多功能还不完善。至于性能如何,笔者还不好做评论,可以看官方给出的初步基准测试。有能力的同学,可以参与代码贡献或者 Issue 讨论。
最后谢谢边柳对本文审校和建议。
扩展阅读


