来一瓶 Web Component 魔法胶水
Web Component 已经被浏览器广泛支持,不再是新鲜玩意了,它有很多使用场景,比如编写跨框架的组件库、微前端,完全用它开发复杂的应用也没问题。
而今天我要介绍的是 Web component 如何扮演框架/微应用之间的胶水层这个角色。
Web Component 是前端通用协议
在软件系统中 ,前端通常作为各种后端服务的聚合层,一个页面中可能承载来自多个业务域的内容:
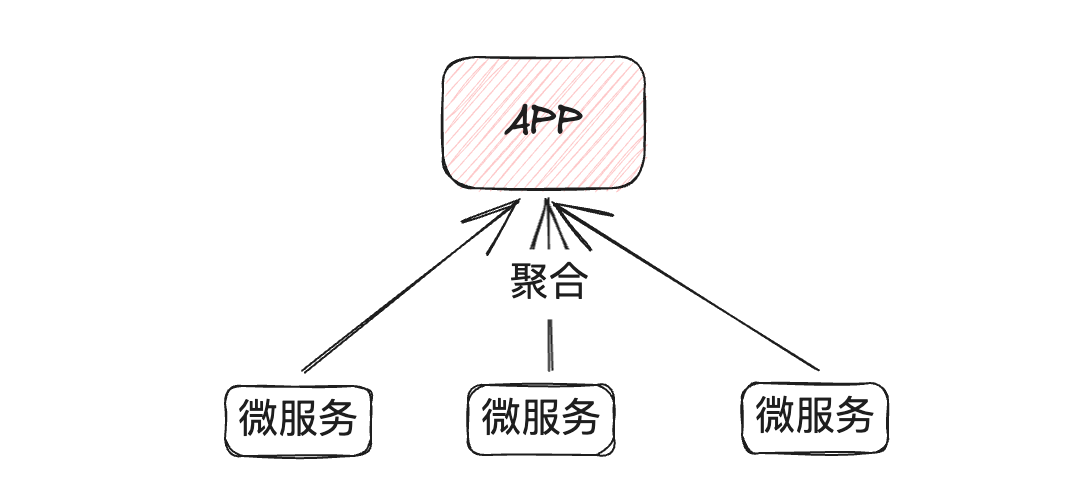
因此前端的业务边界并那么清晰,很难做到和后端微服务一一映射:
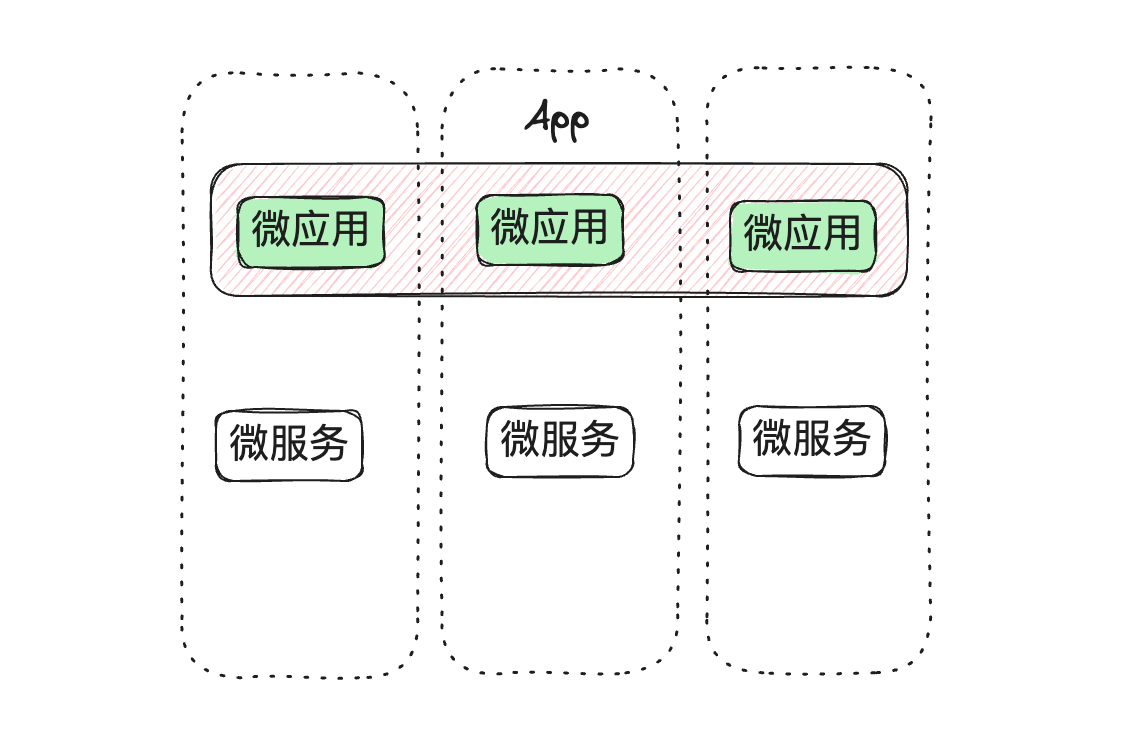
就像微服务一样,微应用之间也会互相依赖。比如在微前端中,我们可能会依赖其他子应用的业务组件,并且这些子应用有可能是异构的,比如 React 引用 Vue 的组件、或者 Vue 3 引用老旧 Vue 2 组件。
尽管在大部分情况下,我们并不建议子应用之间产生耦合,但是考虑迁移的成本等现实因素,我们只能妥协。下面是一些常见的解决办法有:
- 将这些组件剥离出来,放置到通用的业务组件库。
- 子应用暴露服务方法,传入 DOM 挂载点,让目标子应用将元素渲染到这个 DOM 元素上
- 子应用通过 Web Component 暴露服务。
第一种方式。很多情况,这些组件很难剥离出来,就算剥离出来为了应付异构消费,我们可能还是得通过 Web component 重构。
而第二种方式,还不如直接使用 Web Component , 这是一种标准组件 API,主流的视图框架都支持。
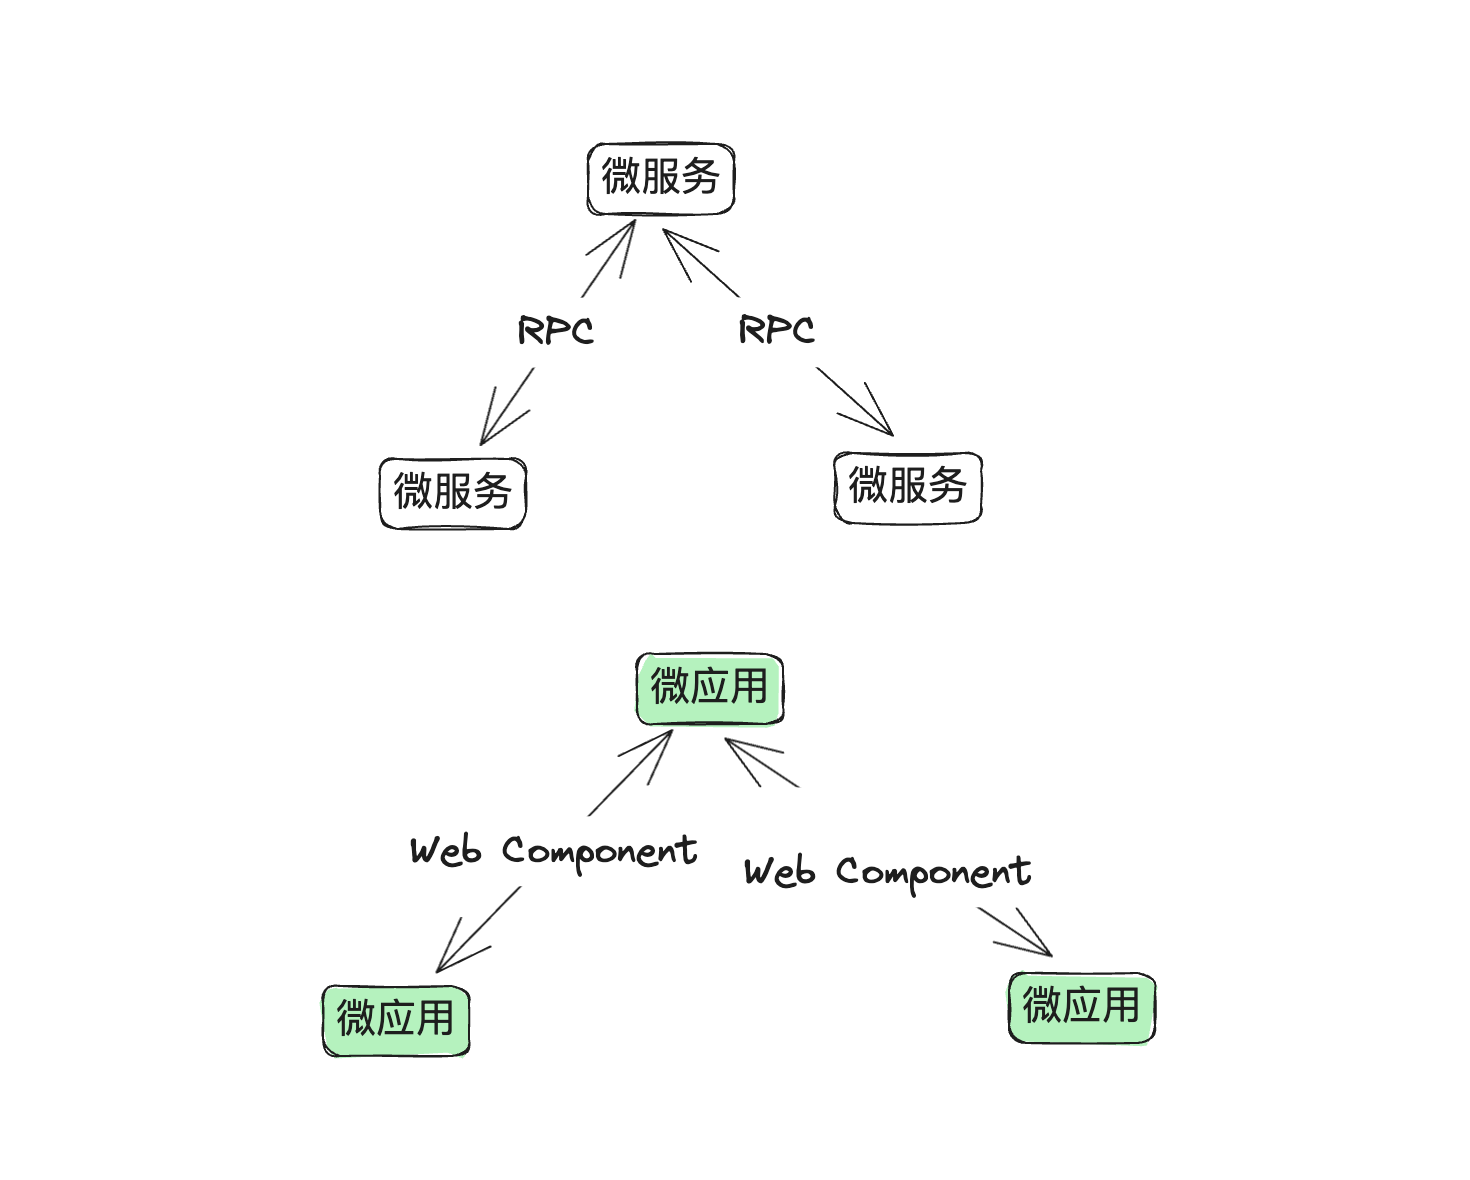
就如异构的微服务使用通用的 HTTP、RPC 协议来通信一样,Web Component 就是异构前端应用之间的「通用协议」。
所以本文的话题就是围绕着:怎么把现有的组件包装成 Web Component 展开。
Web component 概览
Web Component ,或者说自定义元素(Custom Element) 更加贴切,它就是支持我们创建自定义 HTML 元素的相关’技术集合’。
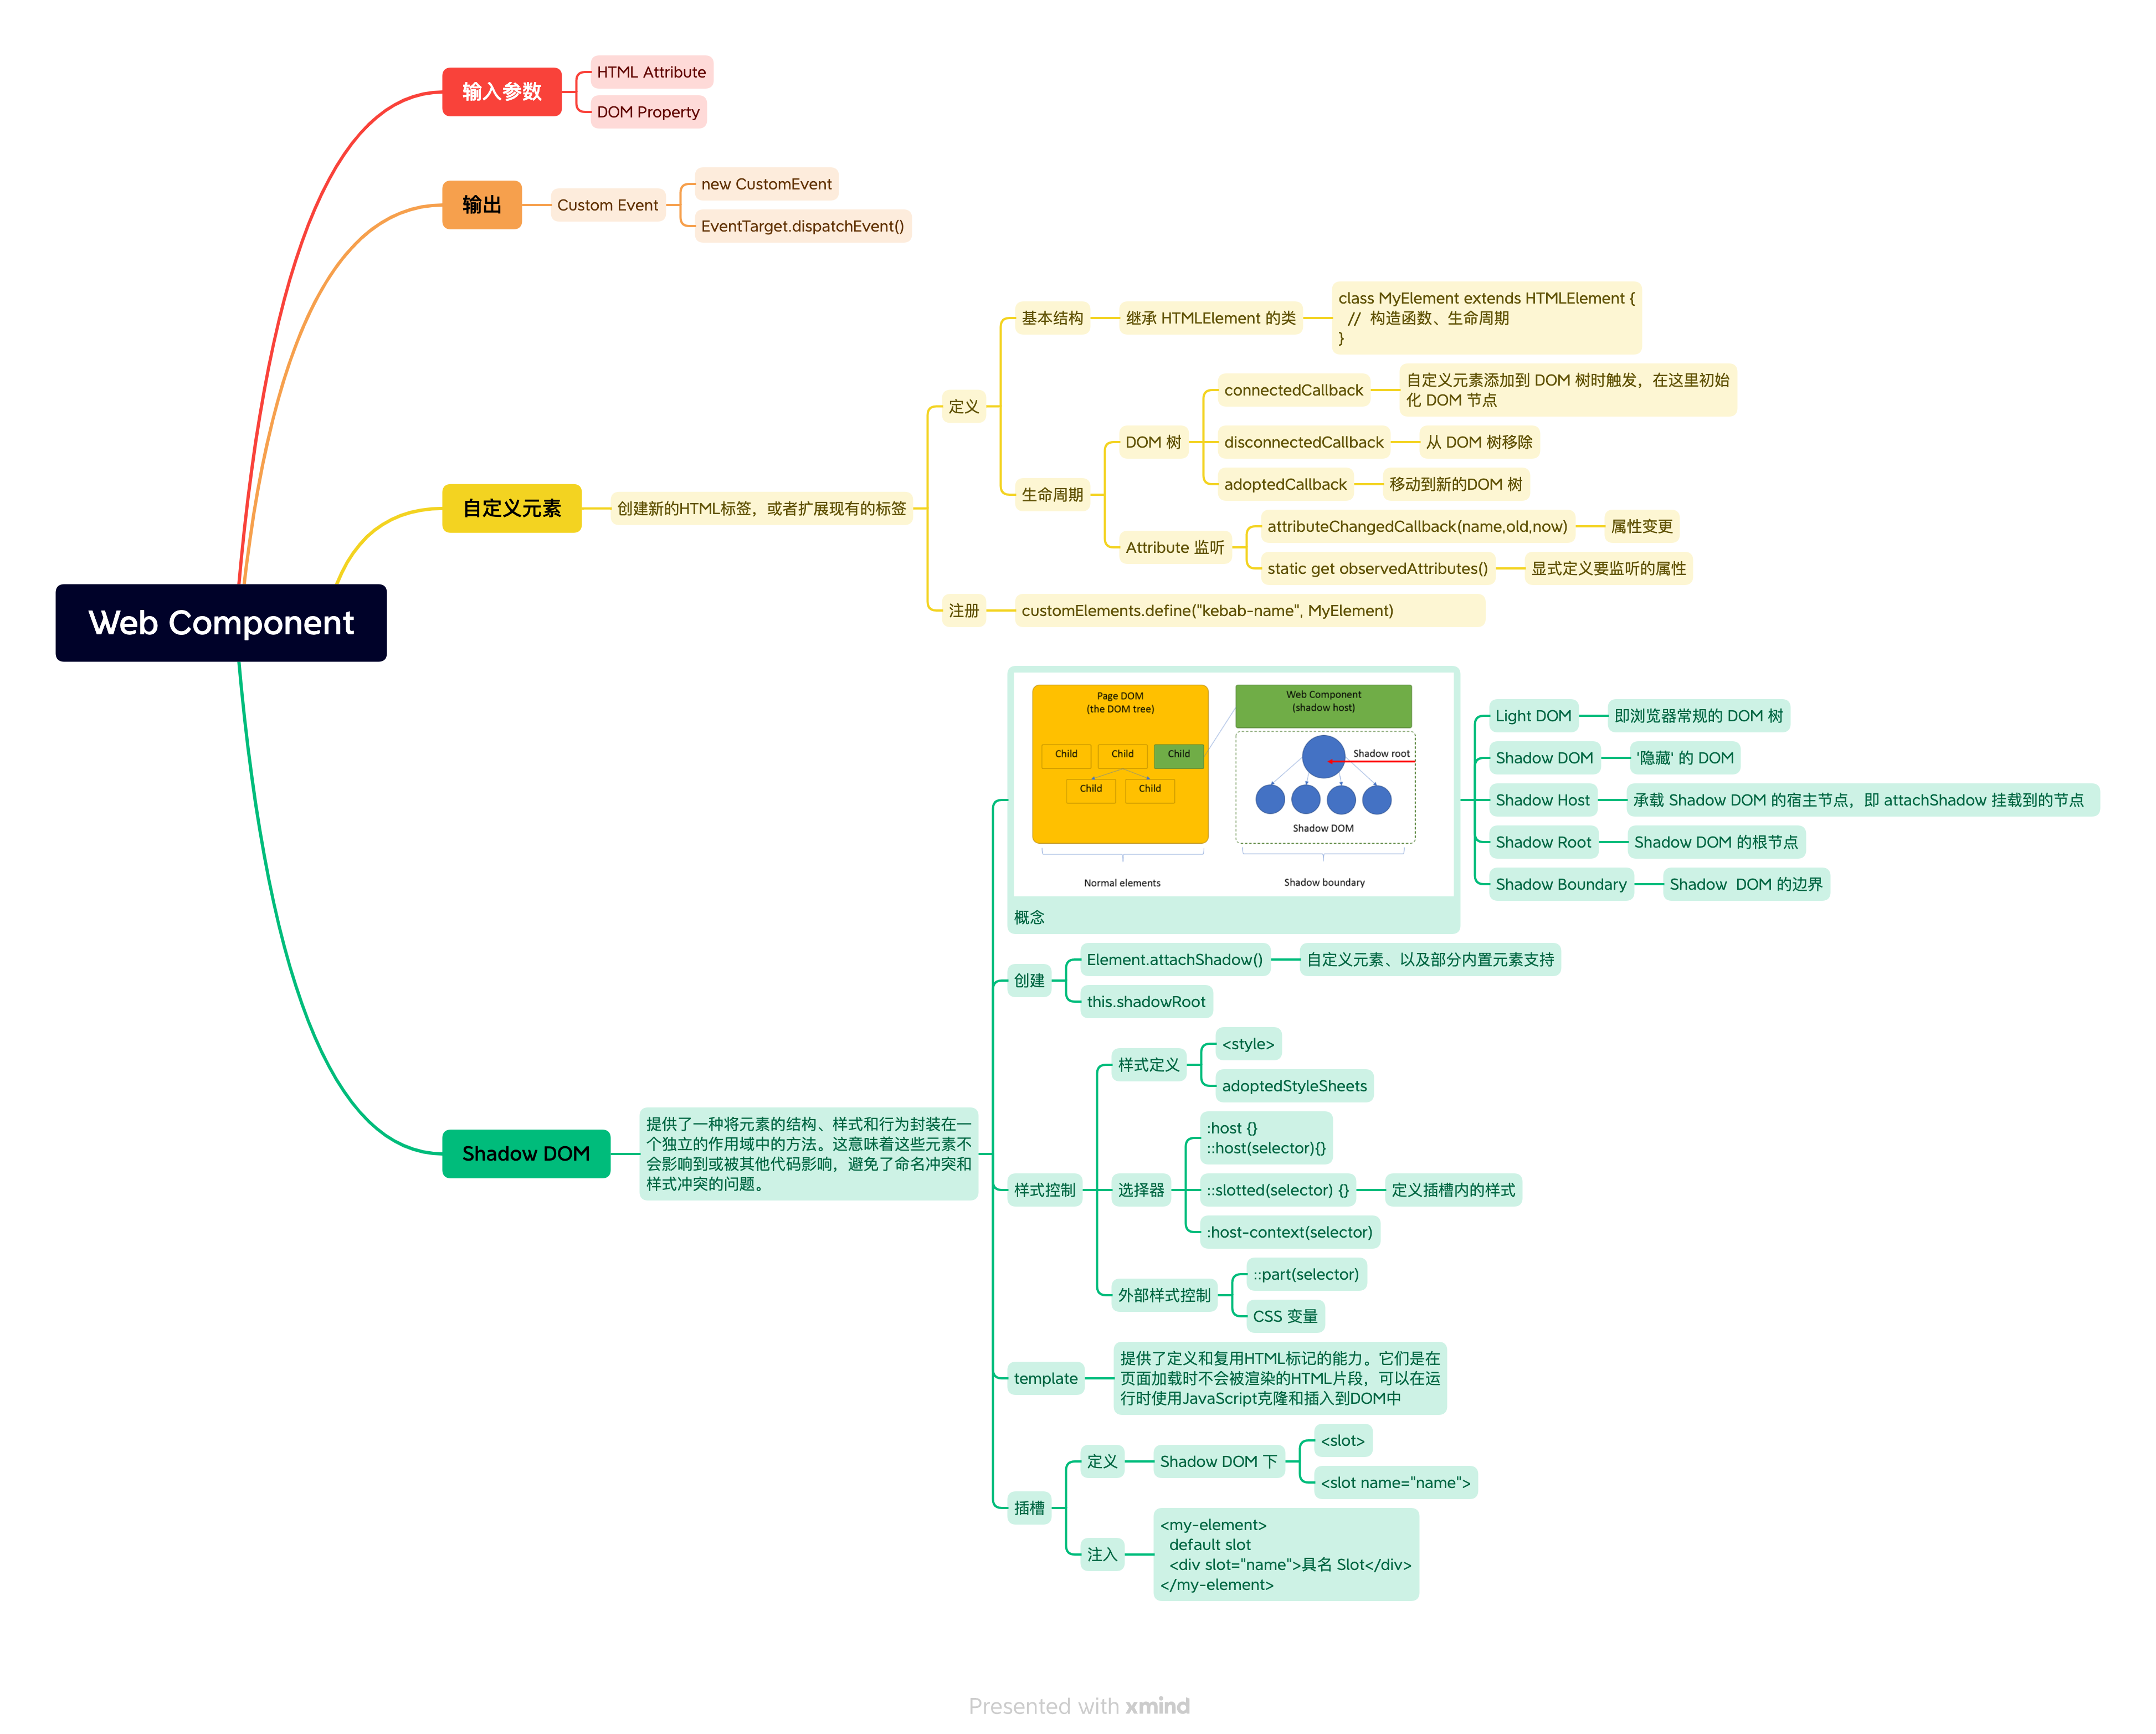
上面的思维导图,基本覆盖了你需要掌握的内容了。如果读者熟悉主流视图框架(比如 Vue),只要花一两个小时就可以掌握啦。这块资料也比较多, 我就展开细节了,推荐 MDN 的相关教程。
先简单写几个 Hello world 吧:
创建一个自定义元素:
<!DOCTYPE html> |
Shadow DOM 版本:
<!DOCTYPE html> |
包装 Vue 3 组件, 官方支持:
import { defineCustomElement } from 'vue' |
包装 React 组件:
class XSearch extends HTMLElement { |
将原有的组件包装成 Web Component, 我们需要做以下工作:
- 怎么把
自定义元素的 Attribute 或者 Property 映射到组件的 Props? - 怎么将组件的事件定义映射成
自定义元素的事件? - 组件的插槽又怎么处理?
- Shadow DOM 要不要用?
下面开始详细介绍这些细节。
映射 Props
HTML 自定义元素有两种输入参数形式:HTML Attribute 和 Property。这两个的区别就无须过多介绍了。Property 就是普通的类实例属性。而 HTML Attribute 相对特殊:
- HTML Attribute 可以在 HTML 中携带,或者通过
Element.setAttribute设置 - 并且它的值只能是字符串形式,因此它只适合传递一些简单的原始类型。我们可能需要进行转换
- Attribute key 不区分大小写。通常习惯使用
kebab-case形式。
最佳实践
关于怎么设计 Attribute 和 Property,社区已经积累了很多经验,常见的最佳实践有:
- 尽量同时提供 HTML Attribute 和 Property 两种形式。并在命名和行为上保持统一
- 不要通过 Attribute 传递复杂数据(非原始类型数据)
- 单数据源(Source of truth)。即不管是 Attribute 还是 Property 都是来源于单一的数据源。
💡 关于 Web Component 的更多最佳实践,可以参考下面文章:
比如简单的场景可以将 Attribute 作为单一数据源:
class MyComponent extends HTMLElement { |
或者使用一个「对象」作为单一数据源:
class MyComponent extends HTMLElement { |
手动维护 Attribute/Property 太麻烦了。
比如我们已经在 Vue 组件声明中定义了 props,可以直接搬过来用, 基于这些信息来批量添加 Attribute 和 Property,另外也方便我们对 Attribute 进行类型转换,以 Vue 2 为例:
const options = typeof Component === 'function' |
React 同理,我们需要按照一定的协议来声明 props,然后批量添加即可。
框架怎么决定用 HTML Attribute 还是 Property 的呢?
那么在常见的视图框架中,在对接自定义元素时,是怎么决定用 HTML Attribute 还是 Property 的呢?
- Vue 2。除了某些特殊的内置字段会使用 Property,默认都使用 Attribute,这个在模板编译阶段就确定下来了。不过开发者可以显式使用
v-bind.prop强制 Property。 - Vue 3 和 React 会判断元素实例中存不存在 Property(通常用 in 操作符),如果存在就使用 Property,否则使用 Attribute。
因此,我们最好是遵循上述的最佳实践,可以让自定义元素更加普适, 减少使用者的心智负担。
代理事件
Web Component 使用 Custom Event 对外抛出事件。
在 Vue 下可以通过拦截 emit 方法来实现代理:
// 🔴 intercept emit |
React 则需要预先声明好需要代理哪些事件,预生成对应的 Props。
视图框架支持自定义元素的事件订阅吗?
- Vue 支持通过
v-on来监听自定义元素的事件。 - React 不支持!因为 React 使用了自己的
合成事件(SyntheticEvent)系统,没有提供手段来监听节点的原生事件。因此自定义元素的事件只能通过 addEventListener 来监听。 这篇文章也介绍了 React 监听原生事件的几种方式。
不使用 Shadow DOM ?
Shadow DOM 就是一个超强的结界, 相互隔离了 DOM 和样式。 宿主无法访问它的内部细节,宿主的样式影响不了 Shadow DOM, Shadow DOM 内部的样式也不会影响宿主。
Shadow DOM 基本上就是 Web Component 的代名词。但实际上 Shadow DOM 对于自定义元素来说是可选的,而 Shadow DOM 也可以用在自定义元素之外。
所以用不用 Shadow DOM 也需要我们来权衡。
很多视图框架官方提供的 Web Component 包装方案,但都是强制使用 Shadow DOM的,比如:
- Vue 3.x 官方内置支持,使用 defineCustomElement 进行定义
- Vue 2.x 则可以通过 Vue CLI 来构建生成,底层由 vue-custom-element 支持
- …
那什么时候不使用 Shadow DOM 呢?
如果我不使用 Shadow DOM, 理由估计只有一个 —— 样式难以管理!
如果没有任何历史包袱的、原子粒度组件库,管理起来要容易很多。我也不需要写一篇文章来讲它了,市面上有很多框架可以帮我们创建 Web Component 组件库,比如 Stencil、Lit、还有哈啰团队最近开源的 Quarkc…
而老旧项目对外暴露的业务组件,首先粒度会比较大,还可能会依赖所在子应用的全局样式、第三方组件库样式等等。这些样式的提取、大量样式应用的性能都是比较大的问题。
较新的浏览器支持 adoptedStyleSheets ,可以让
构造样式表(Constructed stylesheet) 应用到多个 Shadow Root 中,实现共享。 但也需要开发者来管理样式。
如果不使用 Shadow DOM 会有什么后果?
- 我们需要自行处理全局样式污染问题。
- 无法使用 Slot。
- DOM 干扰
- …
Slot 插槽
不使用 Shadow DOM,比较大影响就是无法使用原生 Slot。
先来简单看看它的用法,和早期的 Vue 非常相似。或者说 Vue 在竭力对齐 Web 标准
<template id="my-component"> |
浏览器在 DOM 渲染时,会将自定义元素下的宿主 DOM 节点分配(Assign) 给 Shadow Root 的 Slot 元素:
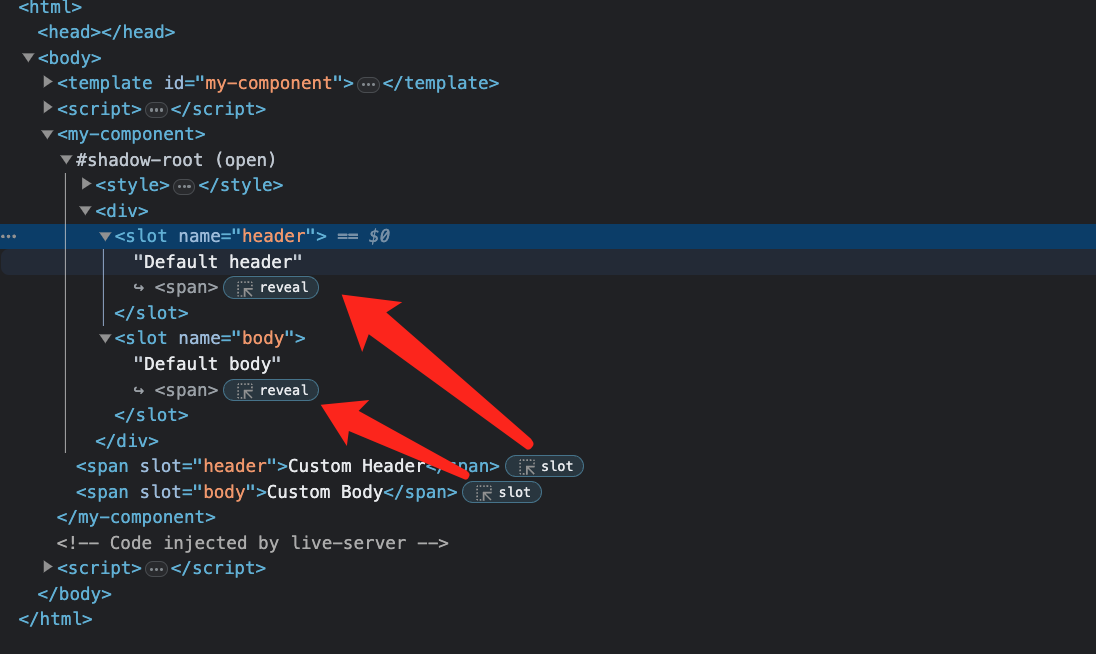
不过 slot 相比 Vue 的插槽就要弱化很多了。比如不支持作用域插槽(Scoped Slot)。因此它只能简单满足一些 DOM 节点的替换。
先来看看主流的视图框架支不支持原生 Slot?
Vue 2。因为 slot 和 Vue 本身的插槽机制是冲突的, 如果你通过https://github.com/vuejs/vue-web-component-wrapper 来创建自定义元素,它的方案比较 Hack, 它会监听宿主 Light DOM 节点的变化,然后将这些 DOM 节点的
innerHTML提取出来,再搬运到 Shadow DOM 下:// 监听 Light DOM
const observer = new MutationObserver(mutations => {
// ... 省略
if (hasChildrenChange) {
// 🔴 toVnodes 使用 转换 childNodes 为 innerHTML,再转成 VNode
wrapper.slotChildren = Object.freeze(toVNodes(
wrapper.$createElement,
self.childNodes
))
}
})
const wrapper = self._wrapper = new Vue({
name: 'shadow-root',
customElement: self,
shadowRoot: self.shadowRoot,
data () {
return {
props: {},
slotChildren: []
}
},
render (h) {
return h(Component, {
ref: 'inner',
props: this.props
// 🔴 VNode 渲染
}, this.slotChildren)
}
})
- Vue 3。而 Vue 3 的
<slot>在自定义元素(isCE)模式(defineCustomElement)下, 会渲染成真正 Slot HTML 元素 - React。React 本身没有 slot 的概念,不存在冲突,所以 slot 也是渲染成 Slot HTML 元素。
如果不使用 slot 还有哪些回退方案?
可以理解 Web Component 的 slot 可以理解为 DOM 节点的「搬运工」。将 Light DOM 搬进 Shadow DOM, 尽管这种说法可能不严谨。
💡从将 Light DOM 「搬进」 Shadow DOM 的过程称为“
分配”(Assignment) 或者’赋值‘。这并不是简单的将 DOM 节点移动到 Shadow DOM,整个过程有点像变量’引用‘, 插槽的内容和作用域还在宿主 DOM, 而插入 Shadow DOM 内部只是一个’分身‘。
如果不是用 Shadow DOM, 还有一些手段来实现类似插槽的效果:
方法一,传入 HTML 字符串。这是最简单、最普适的方案了。至于事件,可以通过冒泡委托。
方法二是定义一些元素锚点(Anchor),供外部来修改这个 DOM 节点。
我们可以使用 Vue 3 的 Teleport 或者 React Portal 之类的技术来挂载。下面是 Vue 示例:
const Demo = defineComponent({ |
<template> |
虽然可以工作,但是不是特别优雅。
Stenciljs 提供另一种思路 —— Slot Relocation (插槽重定位)。
Stencil 是一个 Web Component 编译器,因为早期浏览器对 Shadow DOM 支持比较差,基于兼容性的考虑, Stencil 并不强制所有功能都和 Shadow DOM 绑定。slot 就是一个例子。
那它是怎么模拟 slot 的呢?我们通过一个示例来展开看看:
组件定义:
// my-component.tsx |
组件使用:
render(){ |
渲染结果:
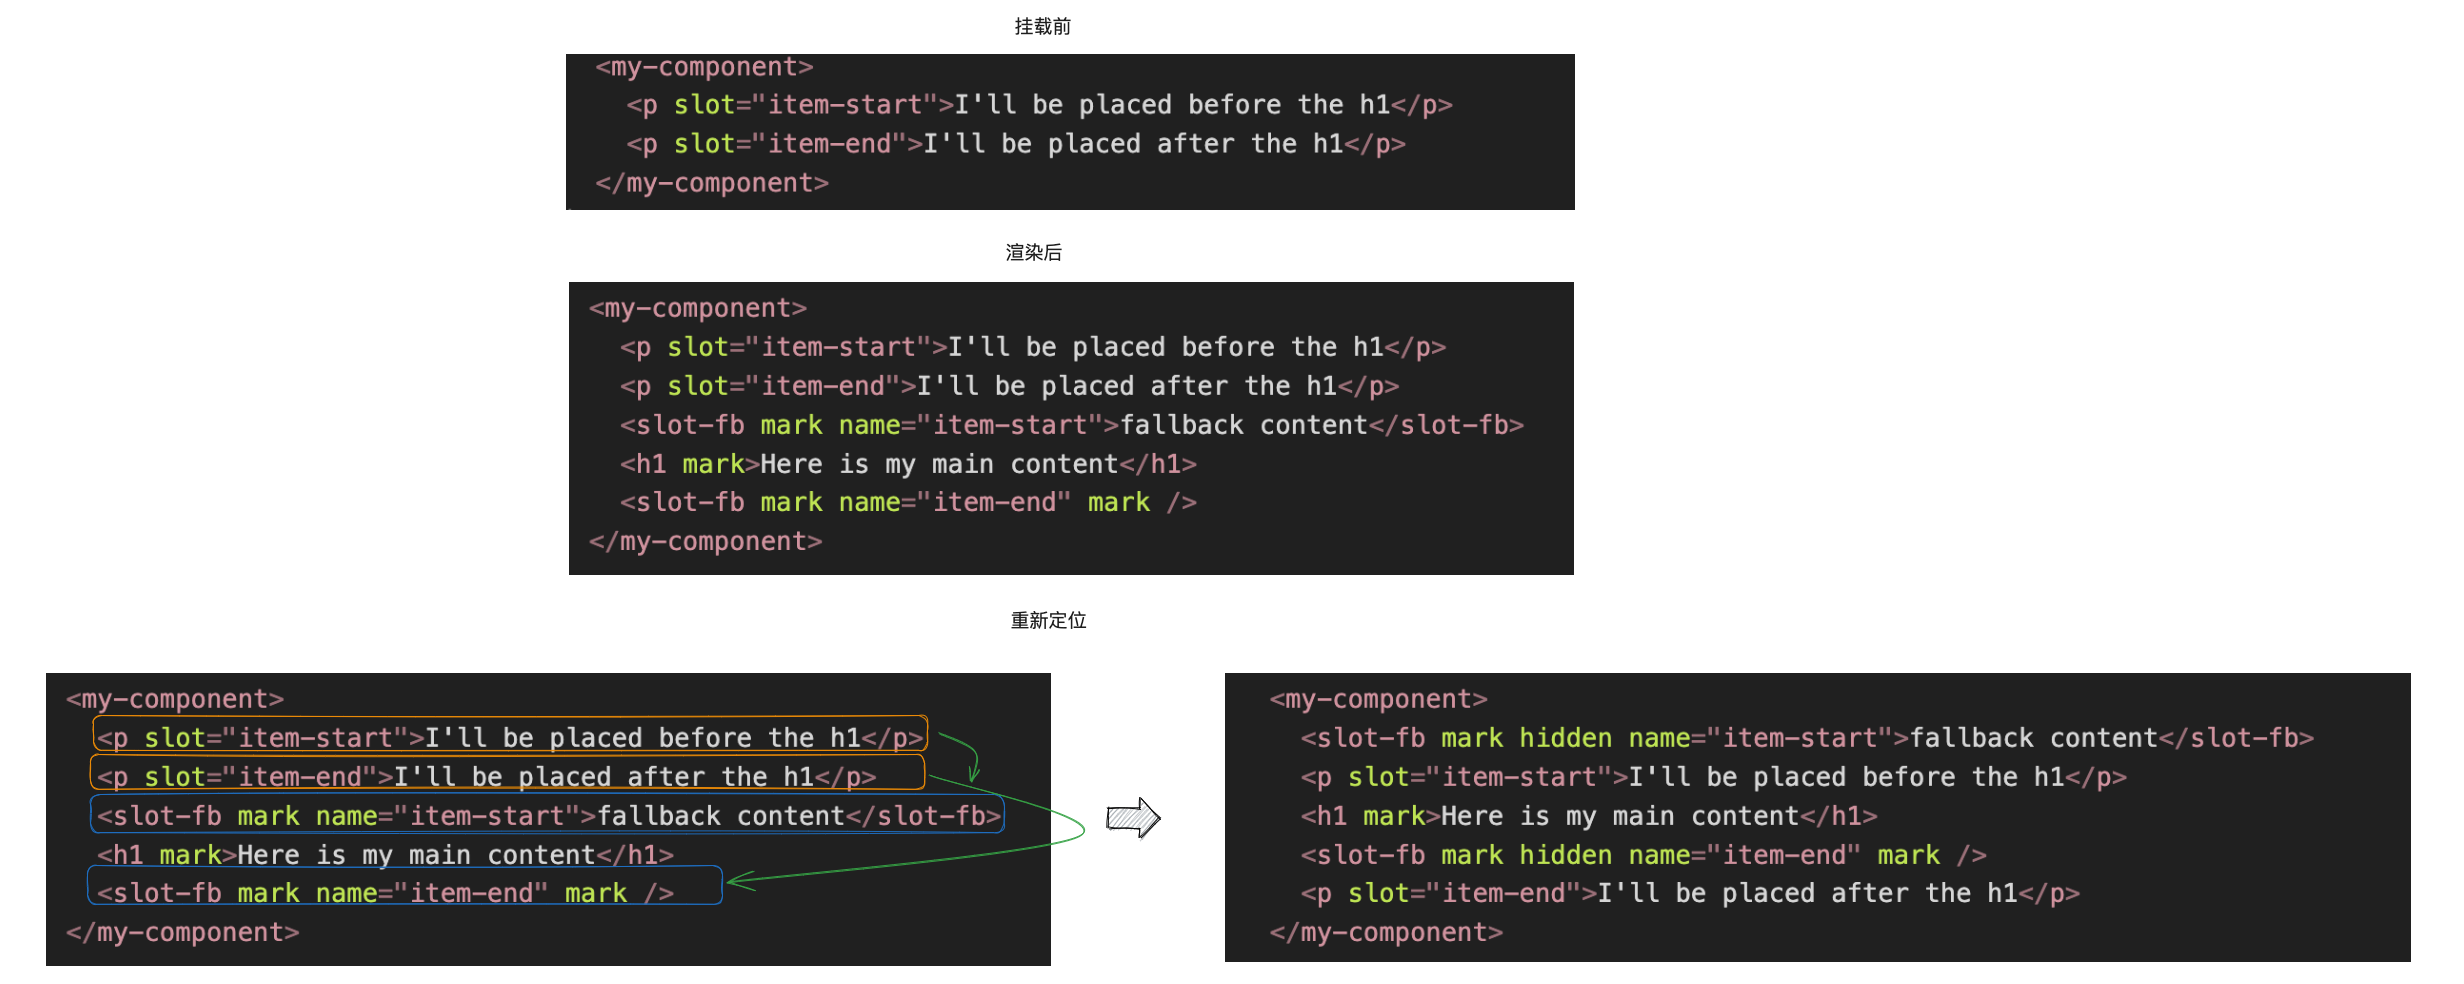
我们来图解一下它的渲染流程:
Stencil 实际上也是一个基于 Virtual DOM 的框架
- 挂载前: 插槽的 DOM 节点实际上在
connectedCallback(即挂载)调用之前,就已经存在。 - 渲染后: Stencil 在渲染时不会完全清空宿主元素(host),渲染的内容以 append 的形式追加到宿主元素
- 重新定位: 渲染完成后,就会开始插槽重定位。stencil 会遍历宿主元素下的子节点,找出所有非 Virtual DOM 渲染出来的节点(举个例子,Virtual DOM 渲染出来的节点会有特殊的标记, 可以排除掉)。接着对这些节点, 根据
slot=*声明进行重定位,插入到对应的<slot-fb>之后 - 隐藏插槽 Fallback: 接着将已经被占用的
<slot-fb>设置为 hidden,隐藏掉
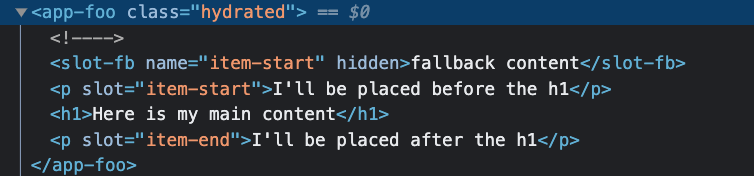
这种思路有一些借鉴意义。不过它目前也有很多缺陷:Stencil 只是在首次挂载时才会进行‘重定位’, 不会动态监听元素新增和移除。比如:
const el = document.querySelector('my-component') |
这也导致了,它和其他视图框架配合使用时,未必能正常工作。
比如下面使用 JSX 条件渲染 footer,底层的操作就是在 app-foo 节点上执行 remove 和 insert 操作,这将导致 Stencil 的插槽重定位失效:
|
毕竟本质上插槽重定位和 Shadow DOM slot 还是不一样。Shadow DOM 方案会隔离出 Light DOM 和 Shadow DOM 两个不同的空间,DOM 的操作互不干扰。
如果没有使用 Shadow DOM , 这些操作都是不安全的,会破坏 Stencil 渲染的结果。
综上,目前最为普适和灵活的方案还是字符串 HTML。
总结
本文将 Web Component 定义为跨框架的微应用之间的通用协议。介绍了将已有组件以 Web Component 形式对外暴露的各种技术细节, 以及主流视图框架对 Web Component 的支持程度。
当我们需要封装一个 Web Component 时需要处理以下事情:
- 如何将自定义元素的 Attribute 和 Property 映射到组件 Props。本文列举了一些最佳实践
- 如何将组件的事件代理出去。
- 权衡要不要使用 Shadow DOM。
- 插槽的使用等等。
总得来说,Web Component 作为一个标准的、底层的技术,在目前看来是不能覆盖现在主流视图框架的所有能力的,哪些能力需要进行取舍,需要开发者自行权衡。
扩展阅读
- MDN 的相关教程
- Web Component 最佳实践
- 图书推荐
- Developing Web Components with TypeScript Native Web Development Using Thin Libraries
- Web Components in Action
- 组件包装
- Web Component 框架
- StencilJS
- LitElement
- Quarkc
- Vue 2/3 的互操作性
- The State Of Web Components in 2022
- Vue 与 Web Components